A lean-to roof might seem simple at first glance, but it’s packed with potential. People are finding out there’s way more to this slanted structure than meets the eye.
From cozy backyard retreats to functional storage spaces, lean-to roof ideas offer solutions that blend practicality with style.
The beauty lies in their adaptability; they work with almost any existing structure and can change unused spaces into something special.
Whether someone’s looking to expand their living area or create a sheltered spot for outdoor activities, the possibilities are surprisingly endless. But here’s the thing: most people only scratch the surface of what these roofs can really do.
What is a Lean-to Roof?
A lean-to roof is exactly what it sounds like: a single-sloped roof that leans against an existing structure. It’s one of the simplest roof designs out there, and that’s part of its charm.
The roof typically attaches to a wall or building on one side while the other end sits lower, creating that signature slant.
This design lets rain and snow slide right off, which makes it pretty practical. People often see them on sheds, porches, or additions to homes.
They’re budget-friendly too, since they require fewer materials than more complex roof styles. Simple doesn’t mean boring, though.
Easy Lean-to Roof Ideas
When it comes to lean-to roof ideas, the options go way beyond basic storage. These structures can tackle all sorts of needs around the property, and the best part is that many of them are totally doable as DIY projects.
1. Garden Shed Extension
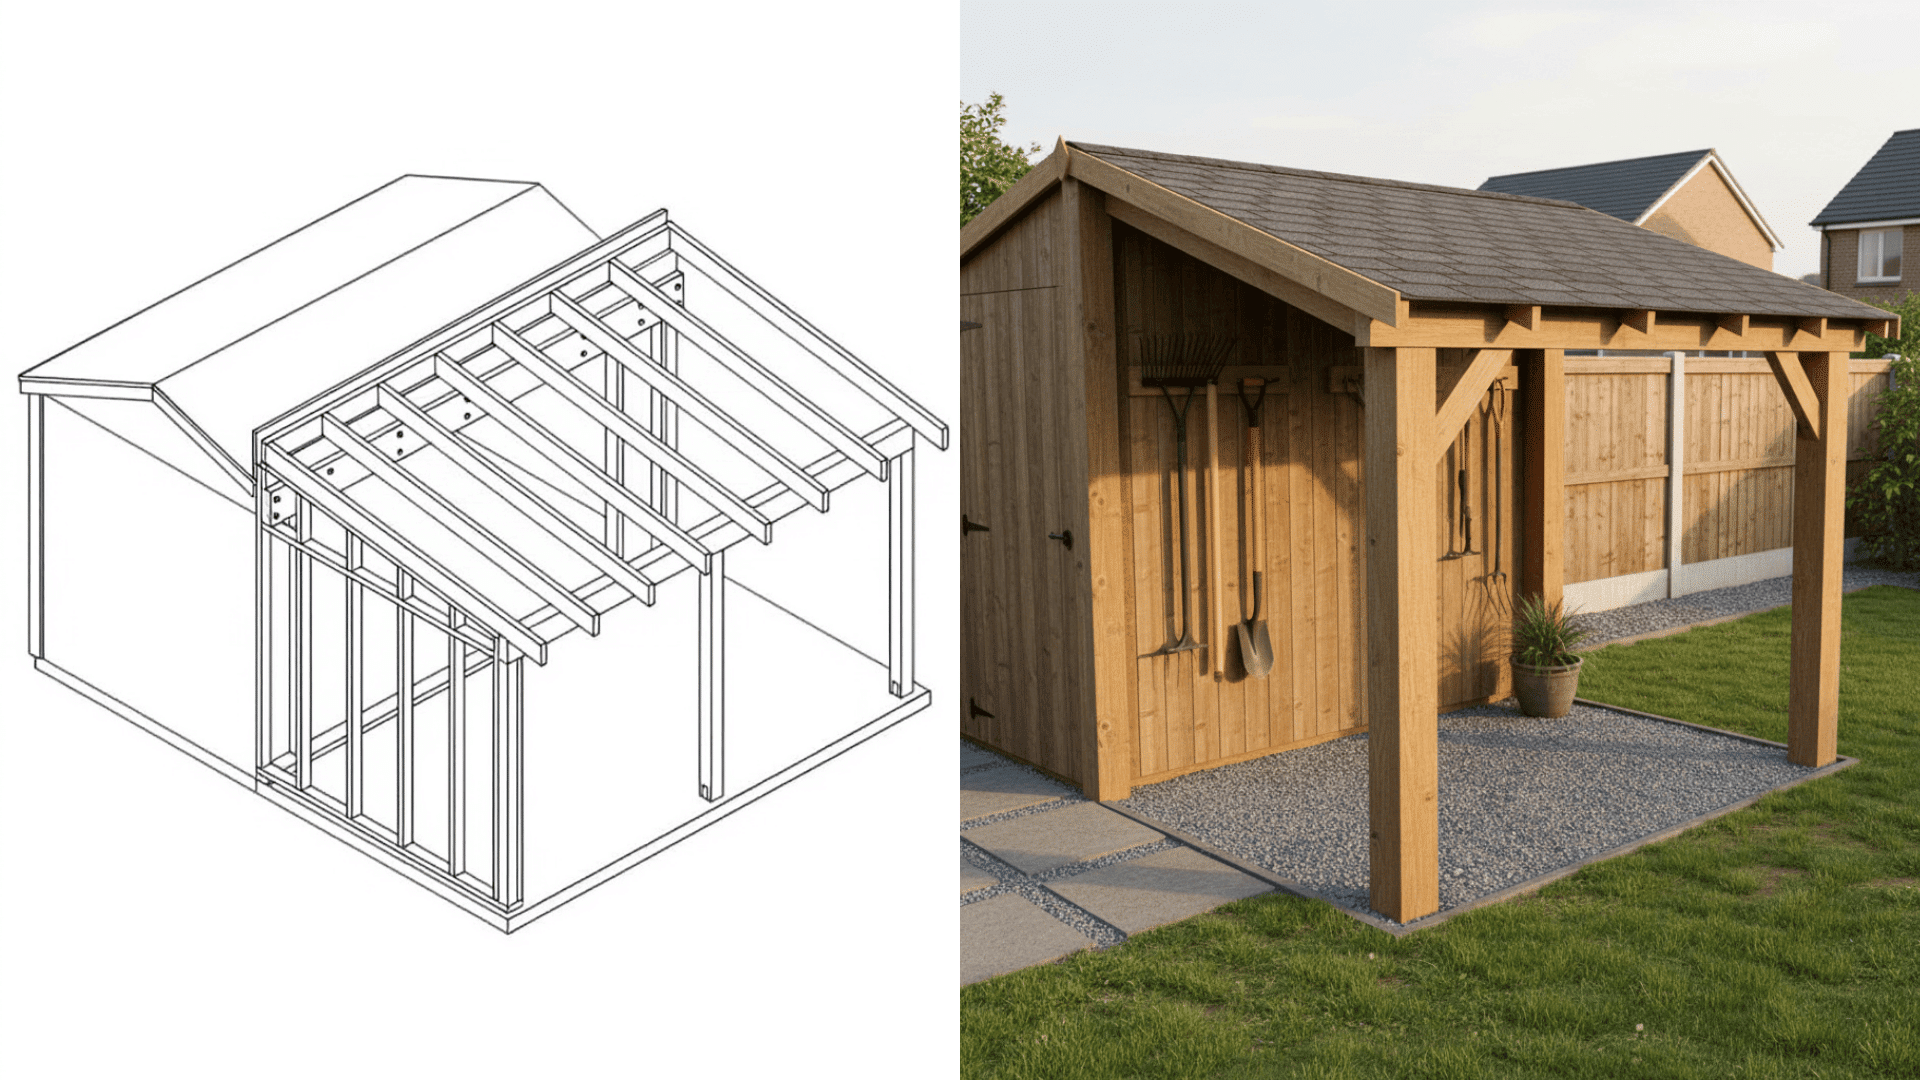
Adding a lean-to roof to an existing shed creates extra storage without building from scratch. It’s perfect for stashing garden tools, pots, or bags of soil.
The single slope makes construction straightforward, and it keeps everything dry and accessible. Plus, it uses the shed’s wall as support, so there’s less framework to worry about.
2. Covered Firewood Storage
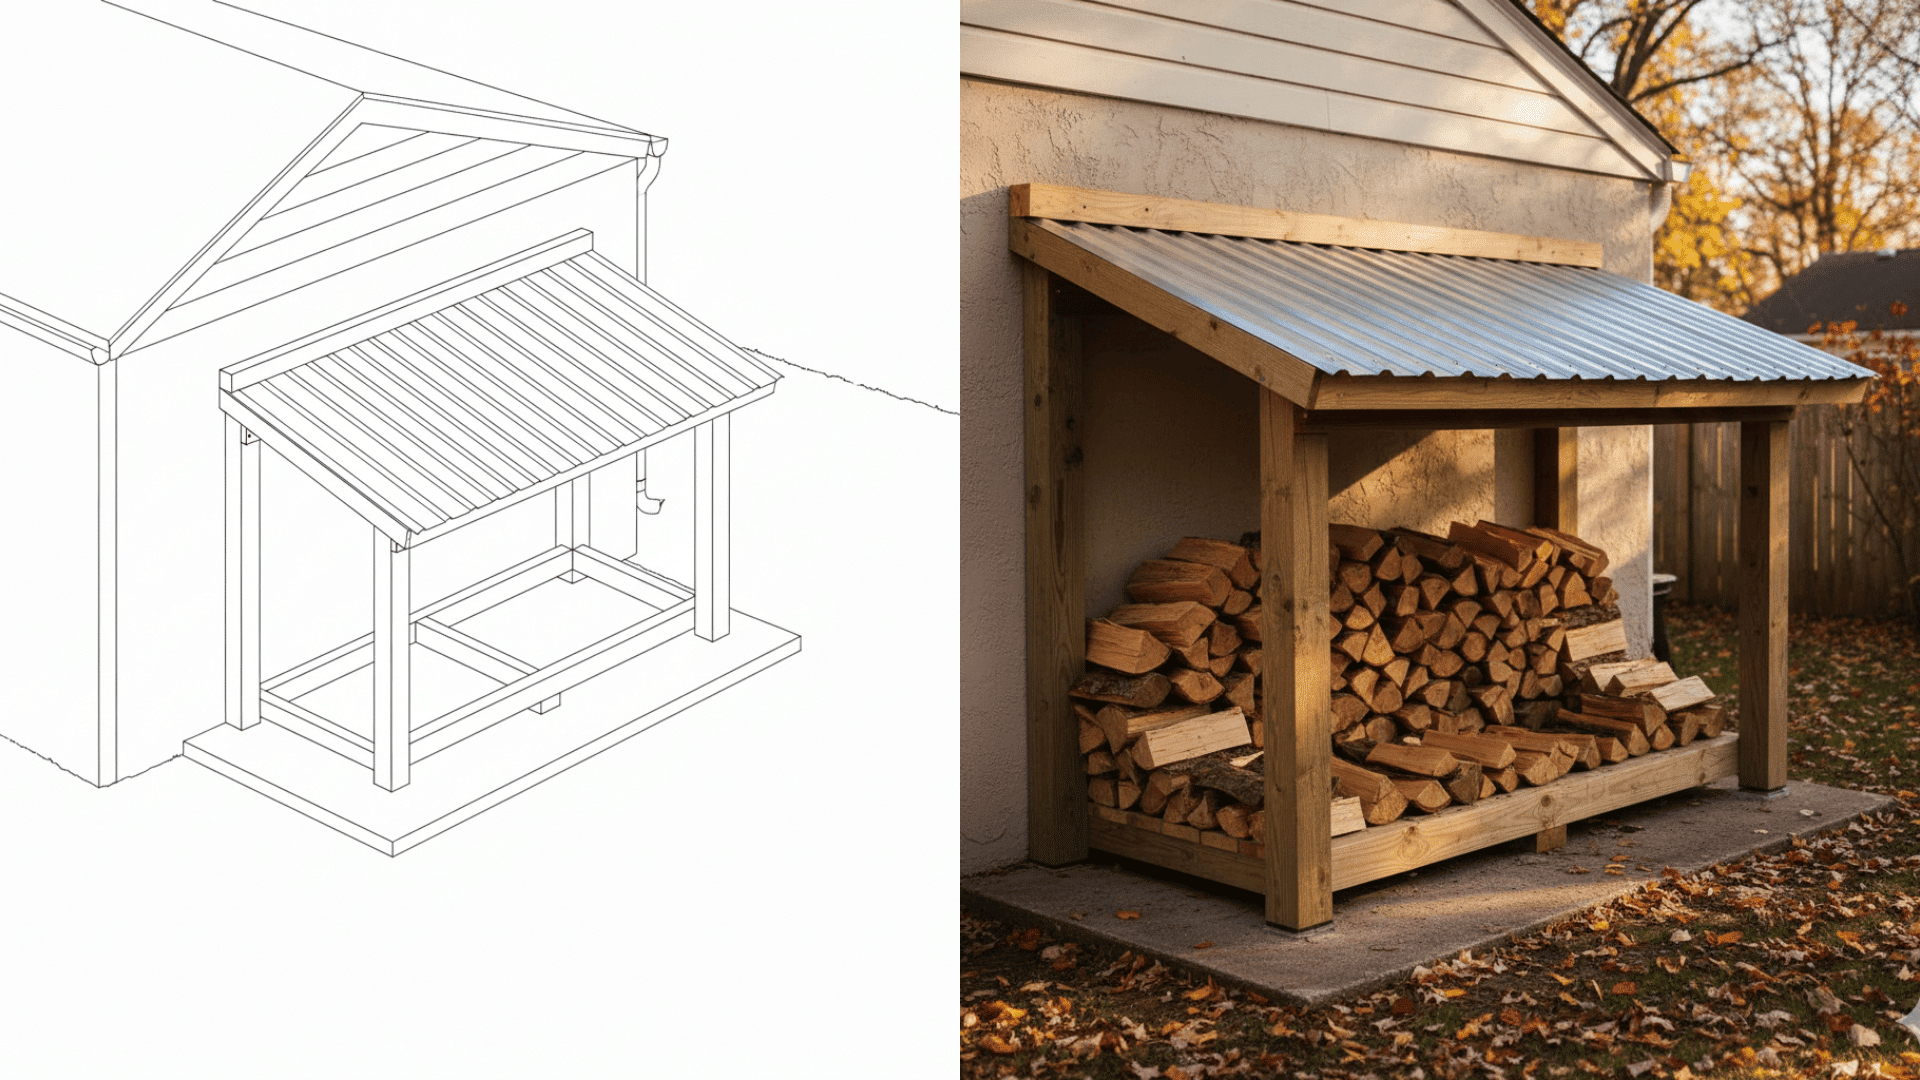
A lean-to roof keeps firewood dry and ready to burn. The slanted design lets moisture run off quickly, and the open sides allow air circulation so the wood seasons properly.
Many people build this against their garage or house wall. It’s a weekend project that pays off all winter long, and it beats hauling wet logs inside.
3. Outdoor Kitchen Shelter
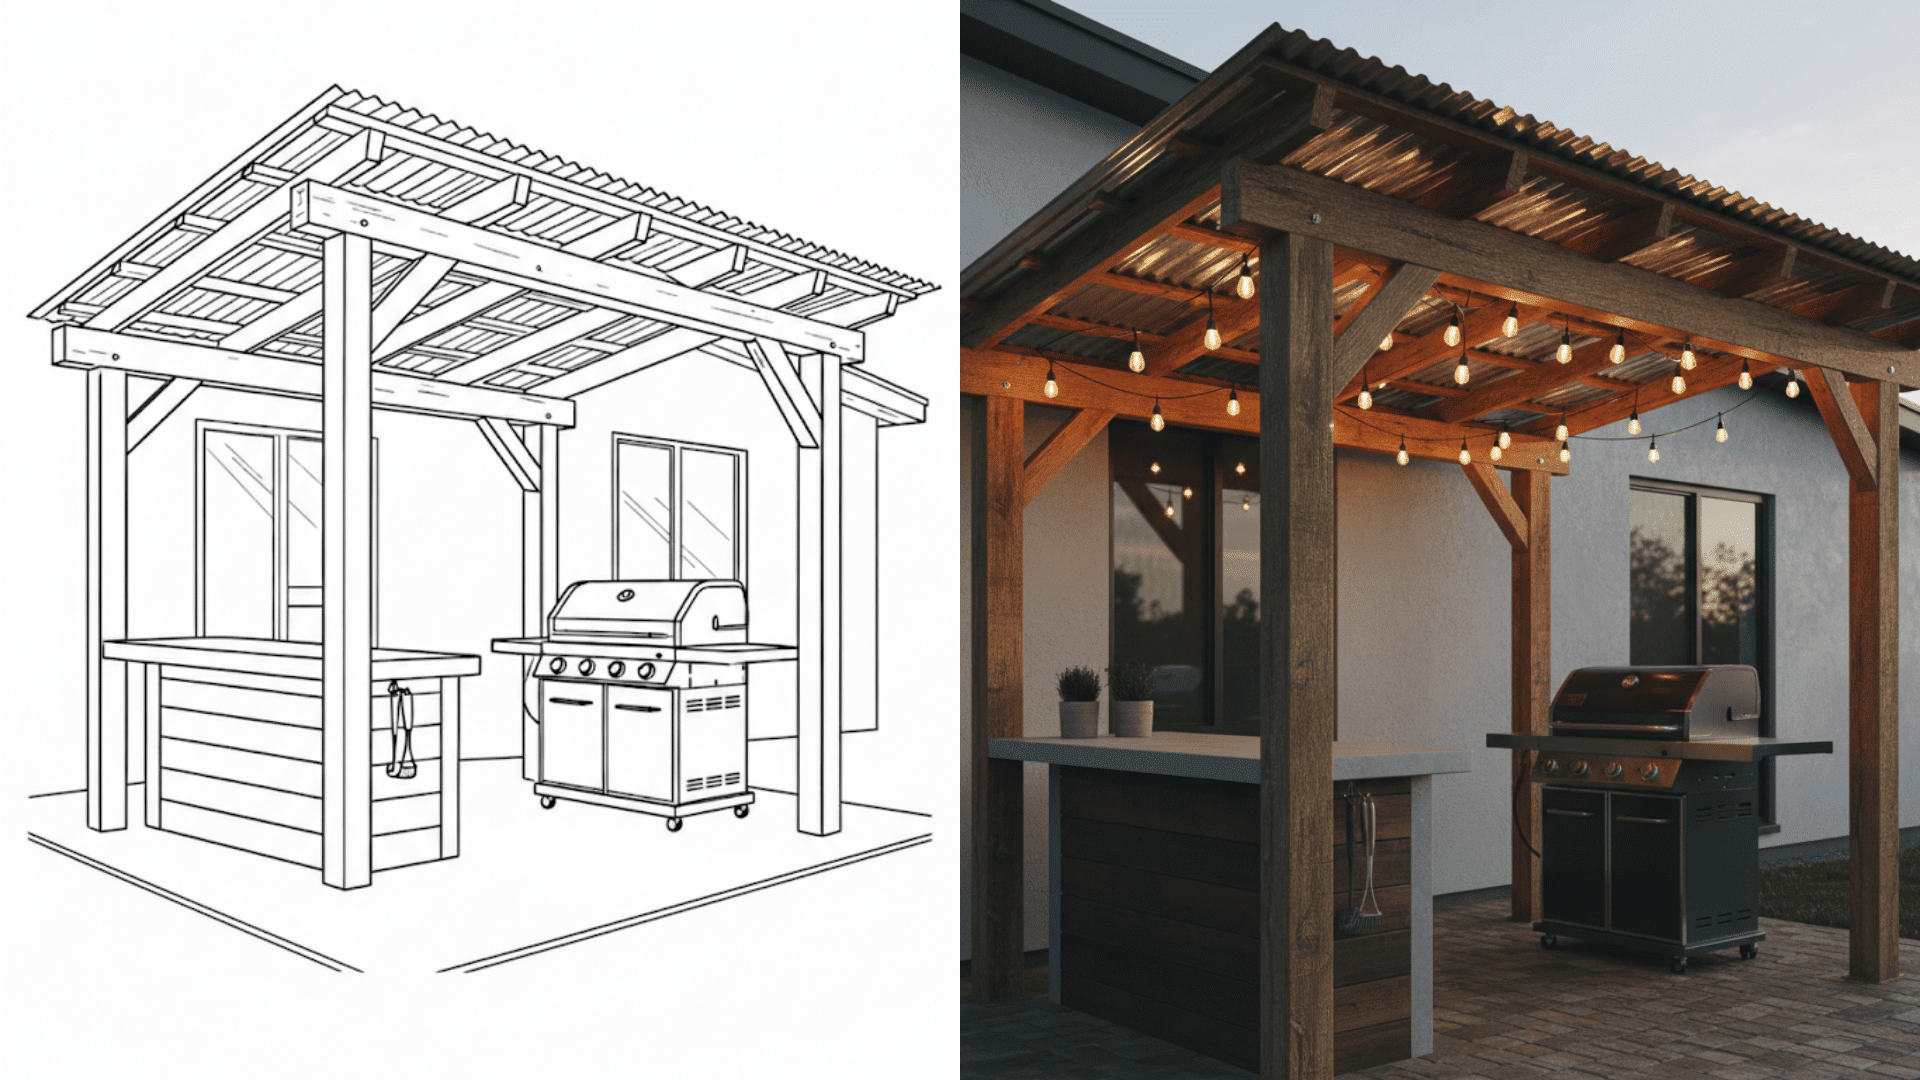
Protecting a grill or outdoor cooking area with a lean-to roof makes sense. It shields equipment from rain and sun damage while creating a comfortable cooking zone.
The structure doesn’t need walls, so smoke vents naturally. Some folks add hooks for utensils or a small countertop underneath. It turns any backyard into a year-round entertainment space.
4. Compact Greenhouse
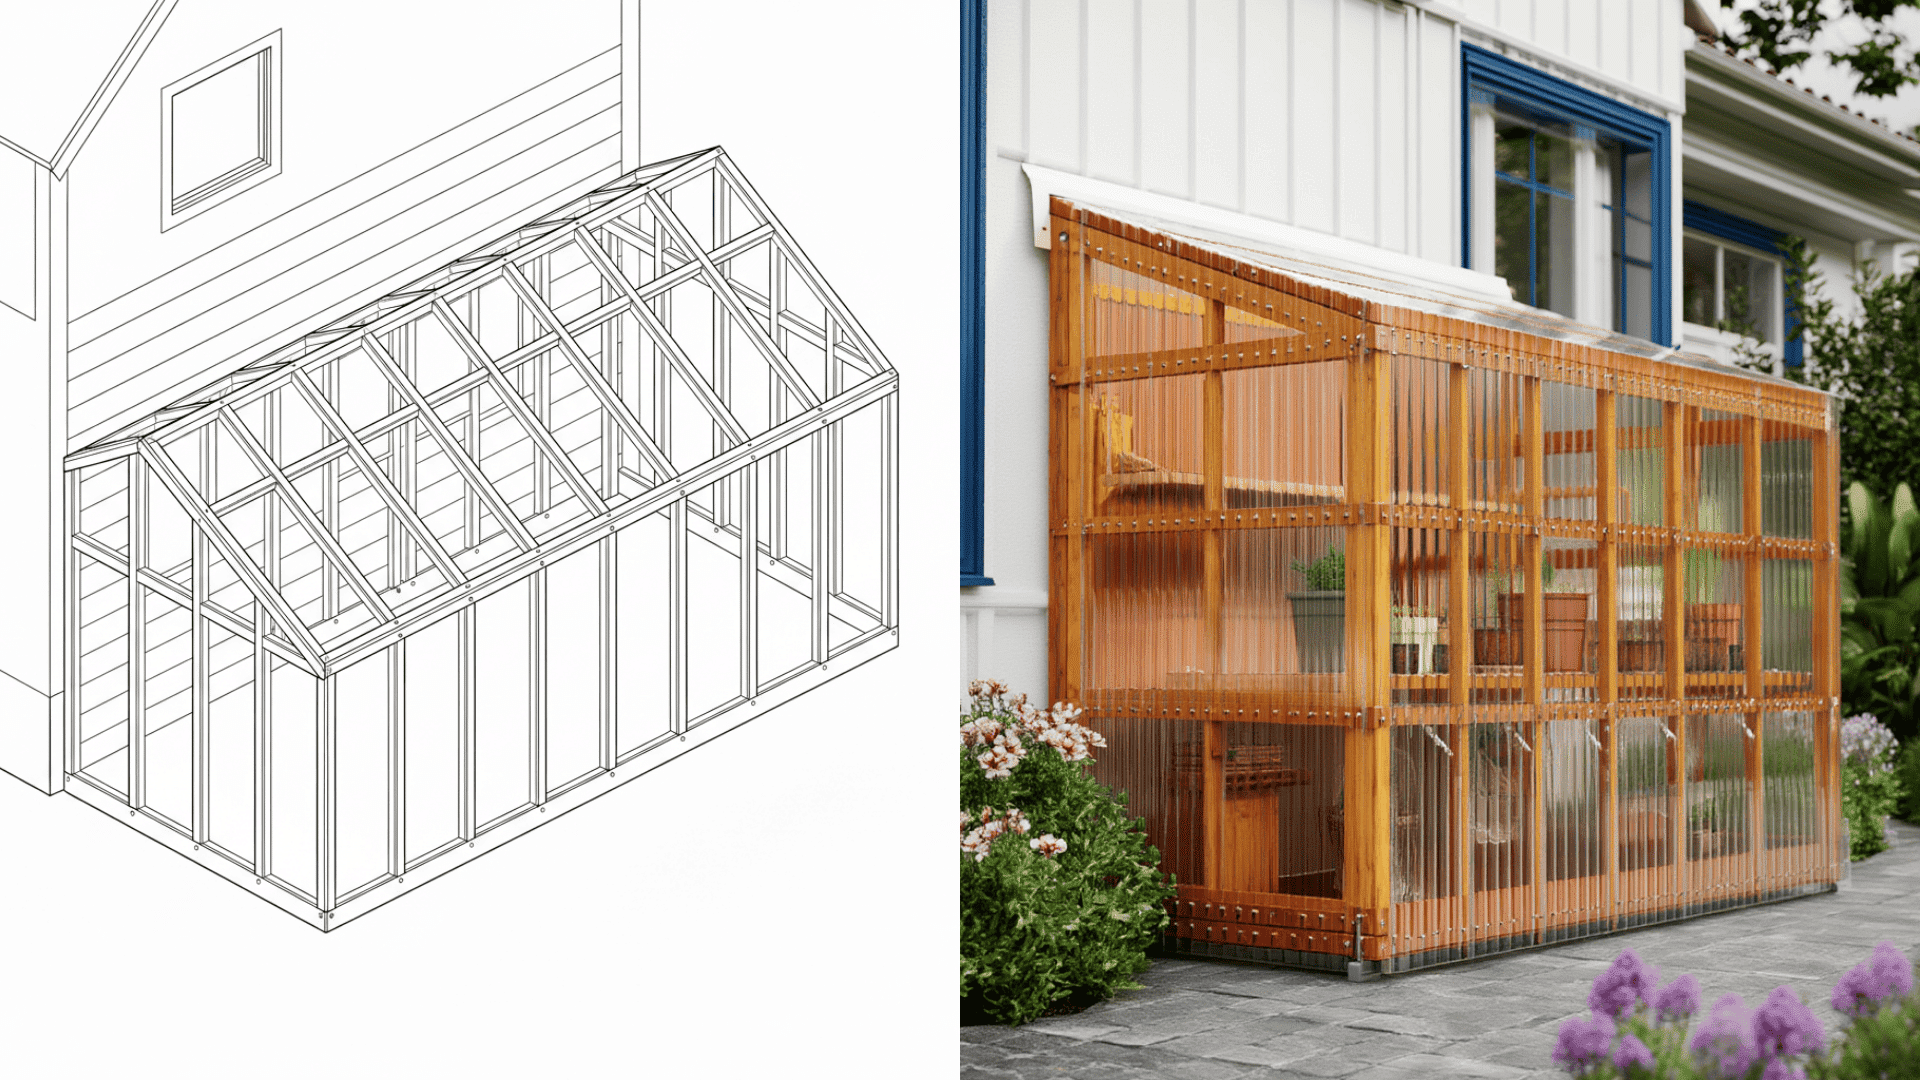
A south-facing lean-to roof against a house wall creates an ideal greenhouse setup. The building radiates warmth at night, which helps plants thrive.
Clear roofing panels let sunlight flood in, and the narrow footprint works even in tight yards. Growing vegetables or starting seedlings becomes way easier with this protected space.
5. Bike and Equipment Storage
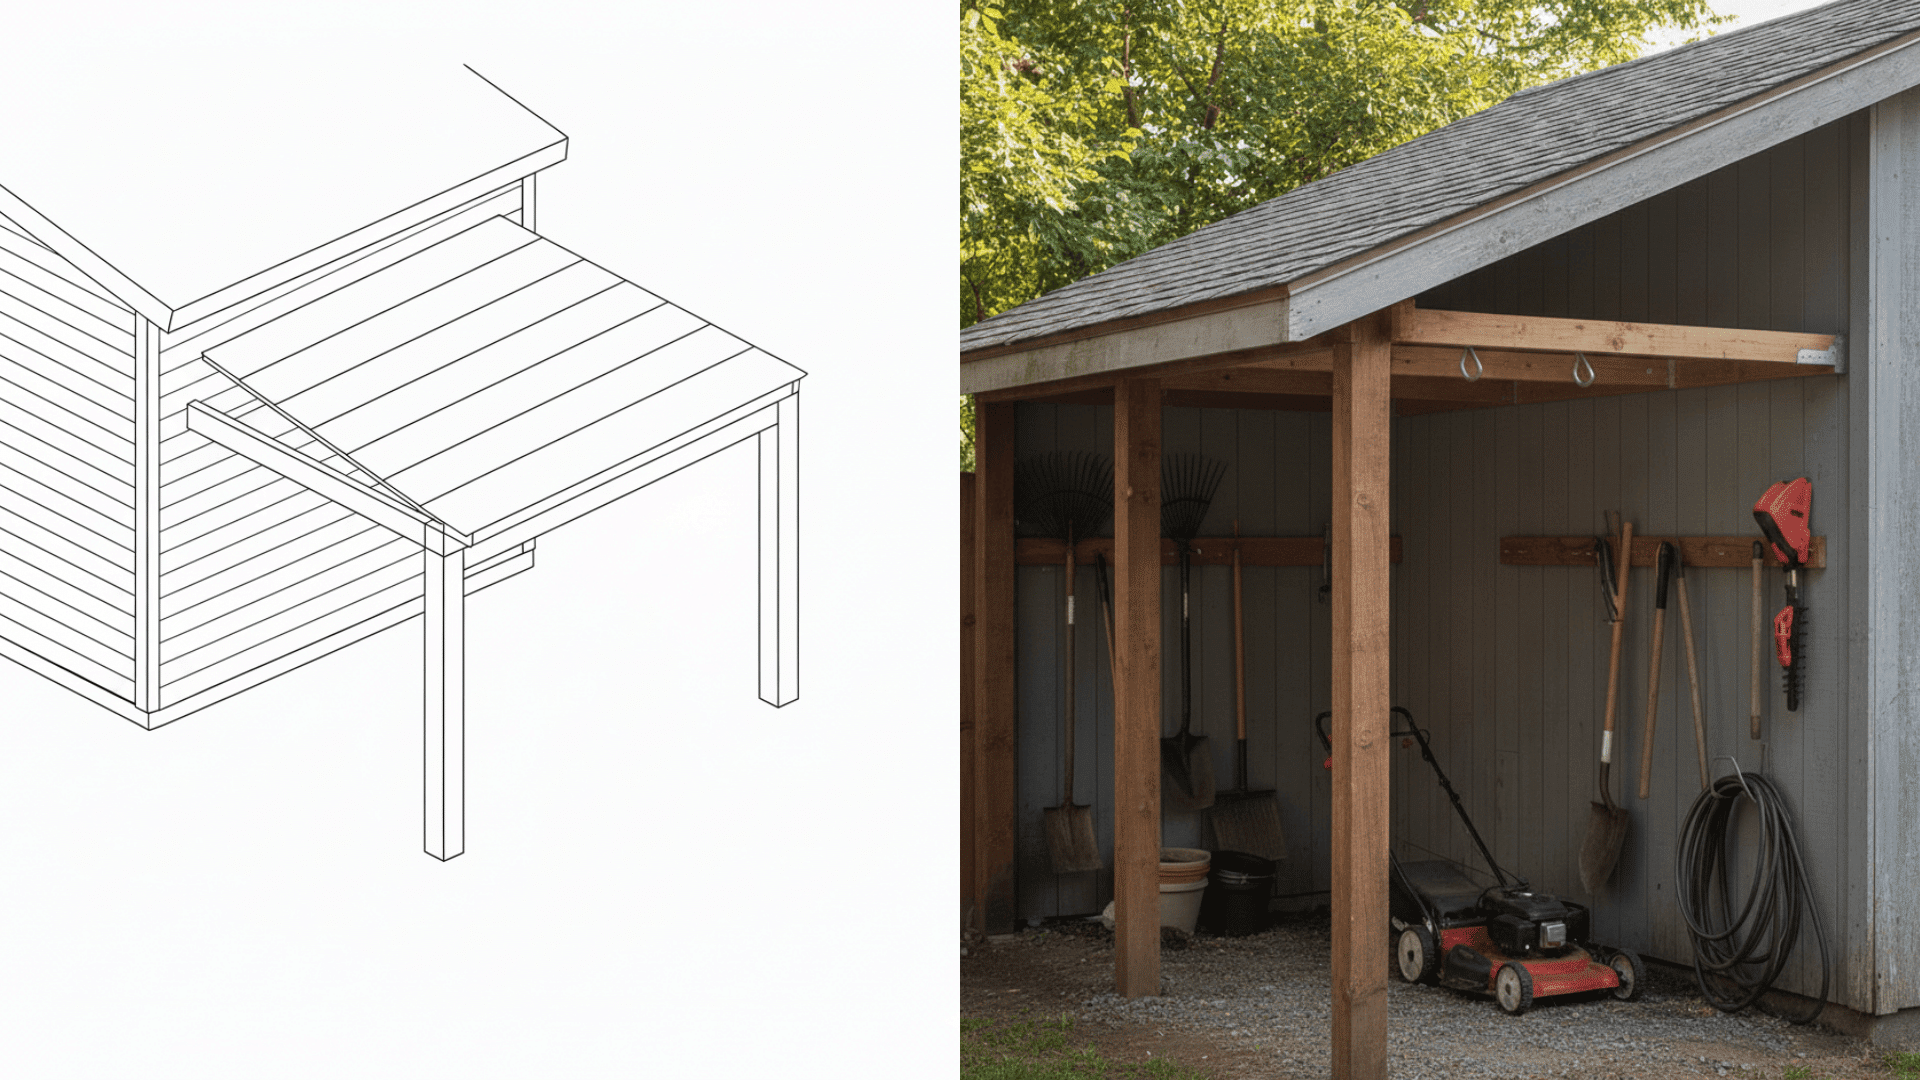
Keeping bikes, lawnmowers, and outdoor gear under a lean-to roof protects them from the elements. The simple design means quick access without fumbling with doors.
It attaches to a fence, garage, or shed wall in no time. Adding some hooks or shelves maximizes the space, and everything stays organized and rust-free.
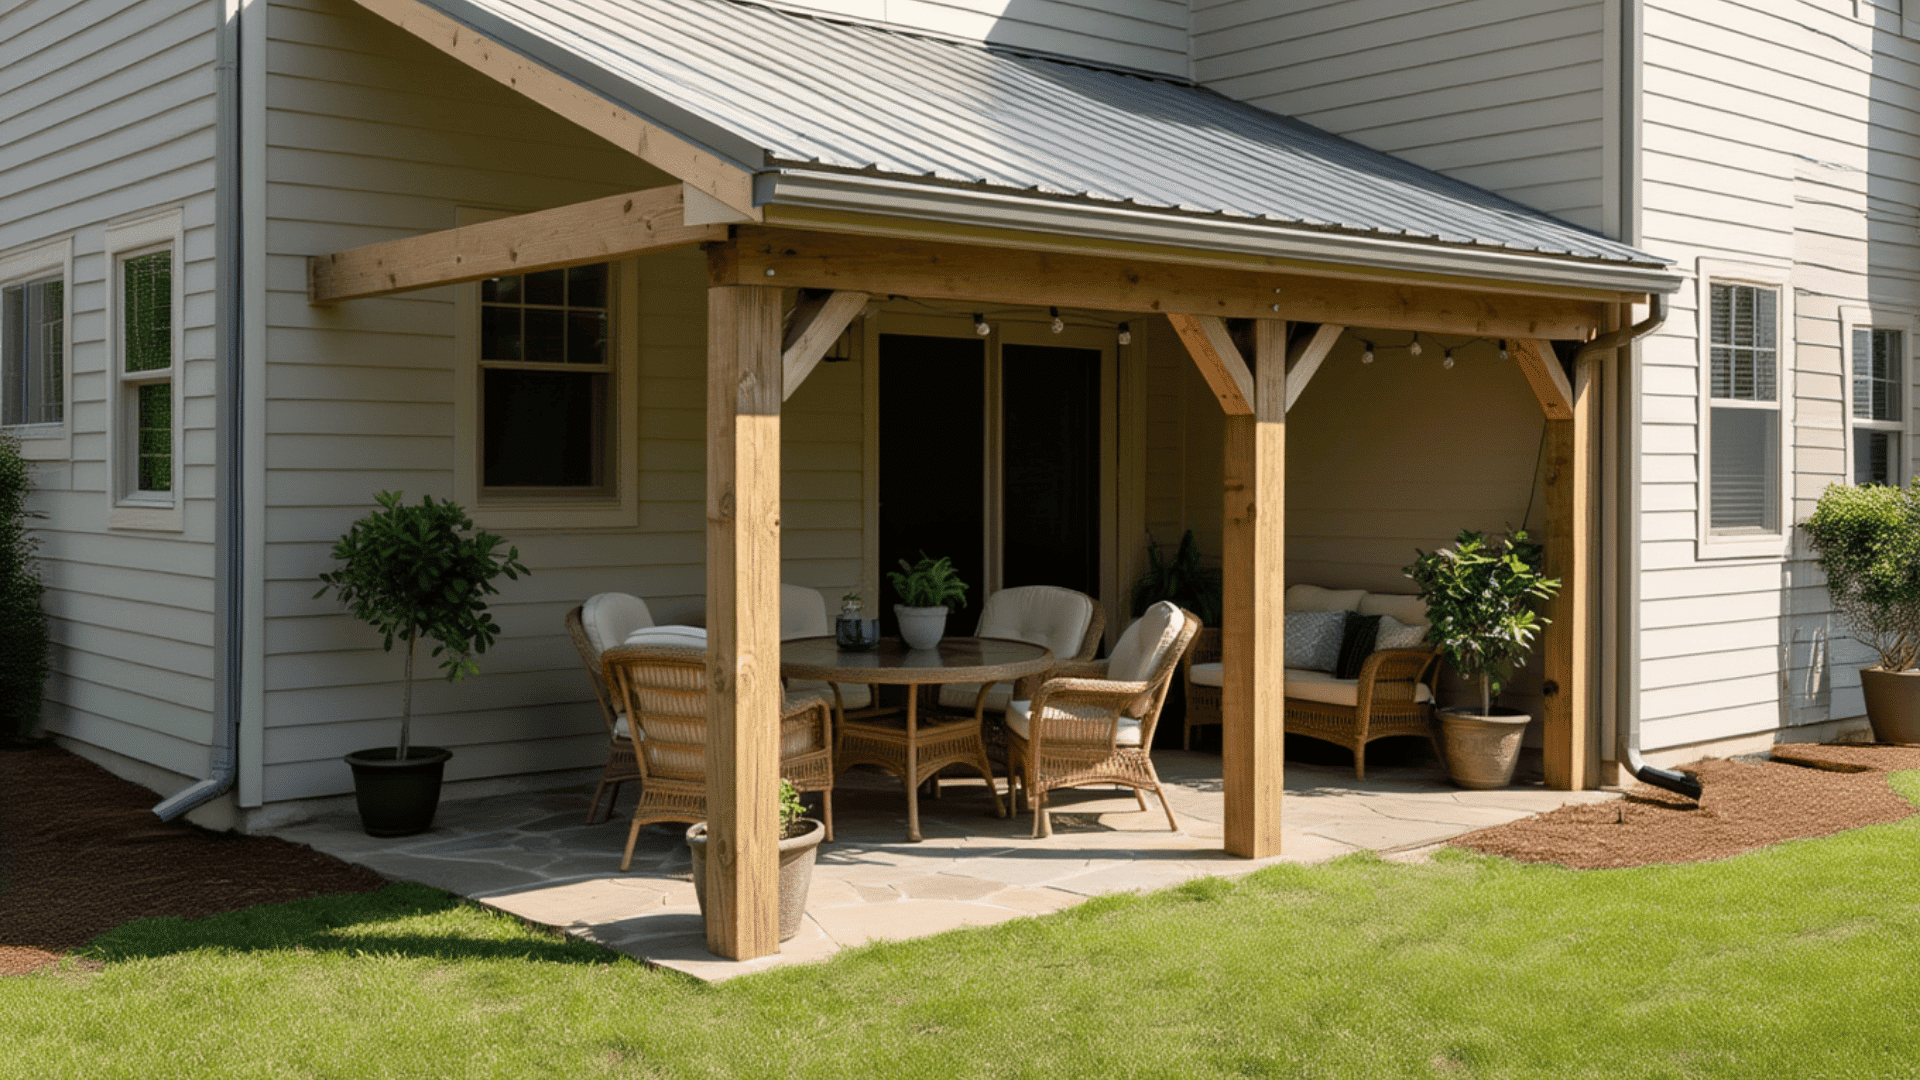
6. Carport or Vehicle Cover
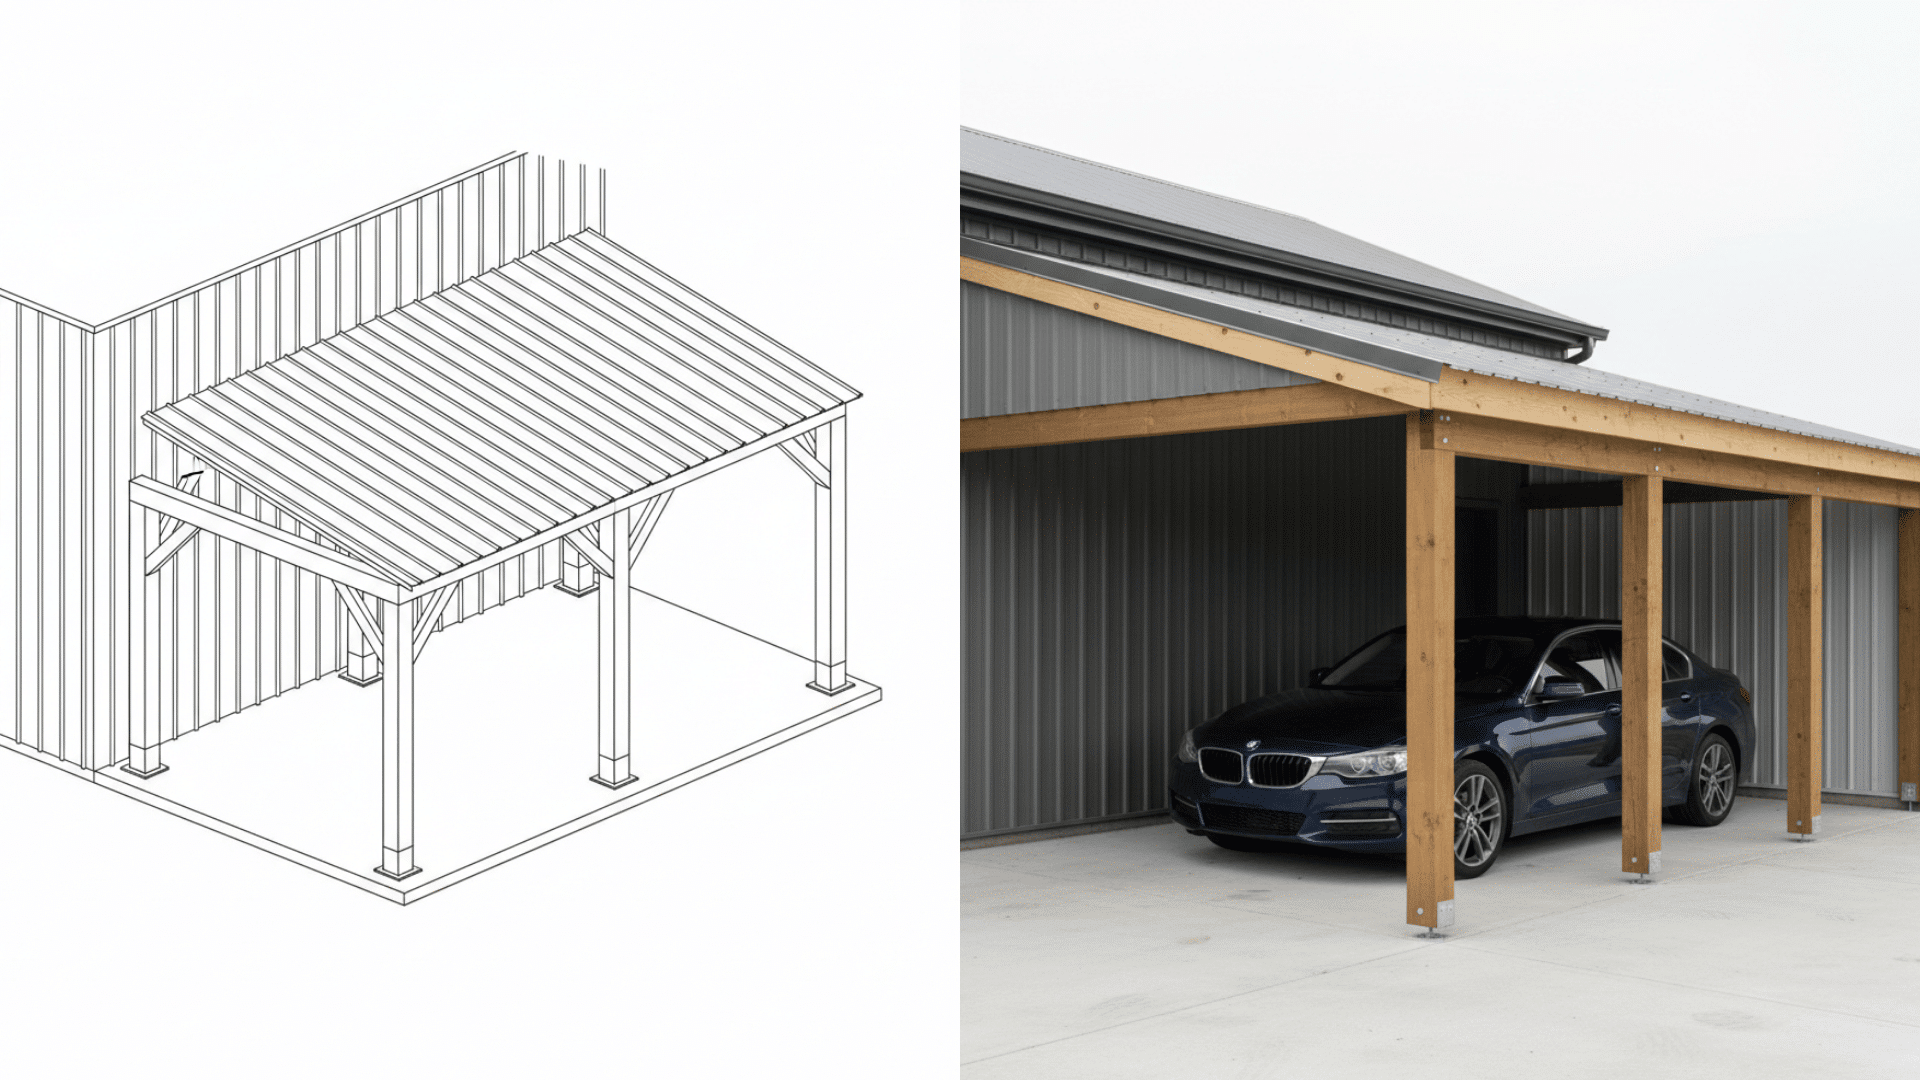
A lean-to makes a practical carport when garage space is tight. It shields cars, motorcycles, or ATVs from harsh weather and tree sap.
The construction is simpler than a standalone garage, but it still offers solid protection. Many DIYers complete this project in a weekend with basic tools and lumber.
7. Front Door Rain Cover
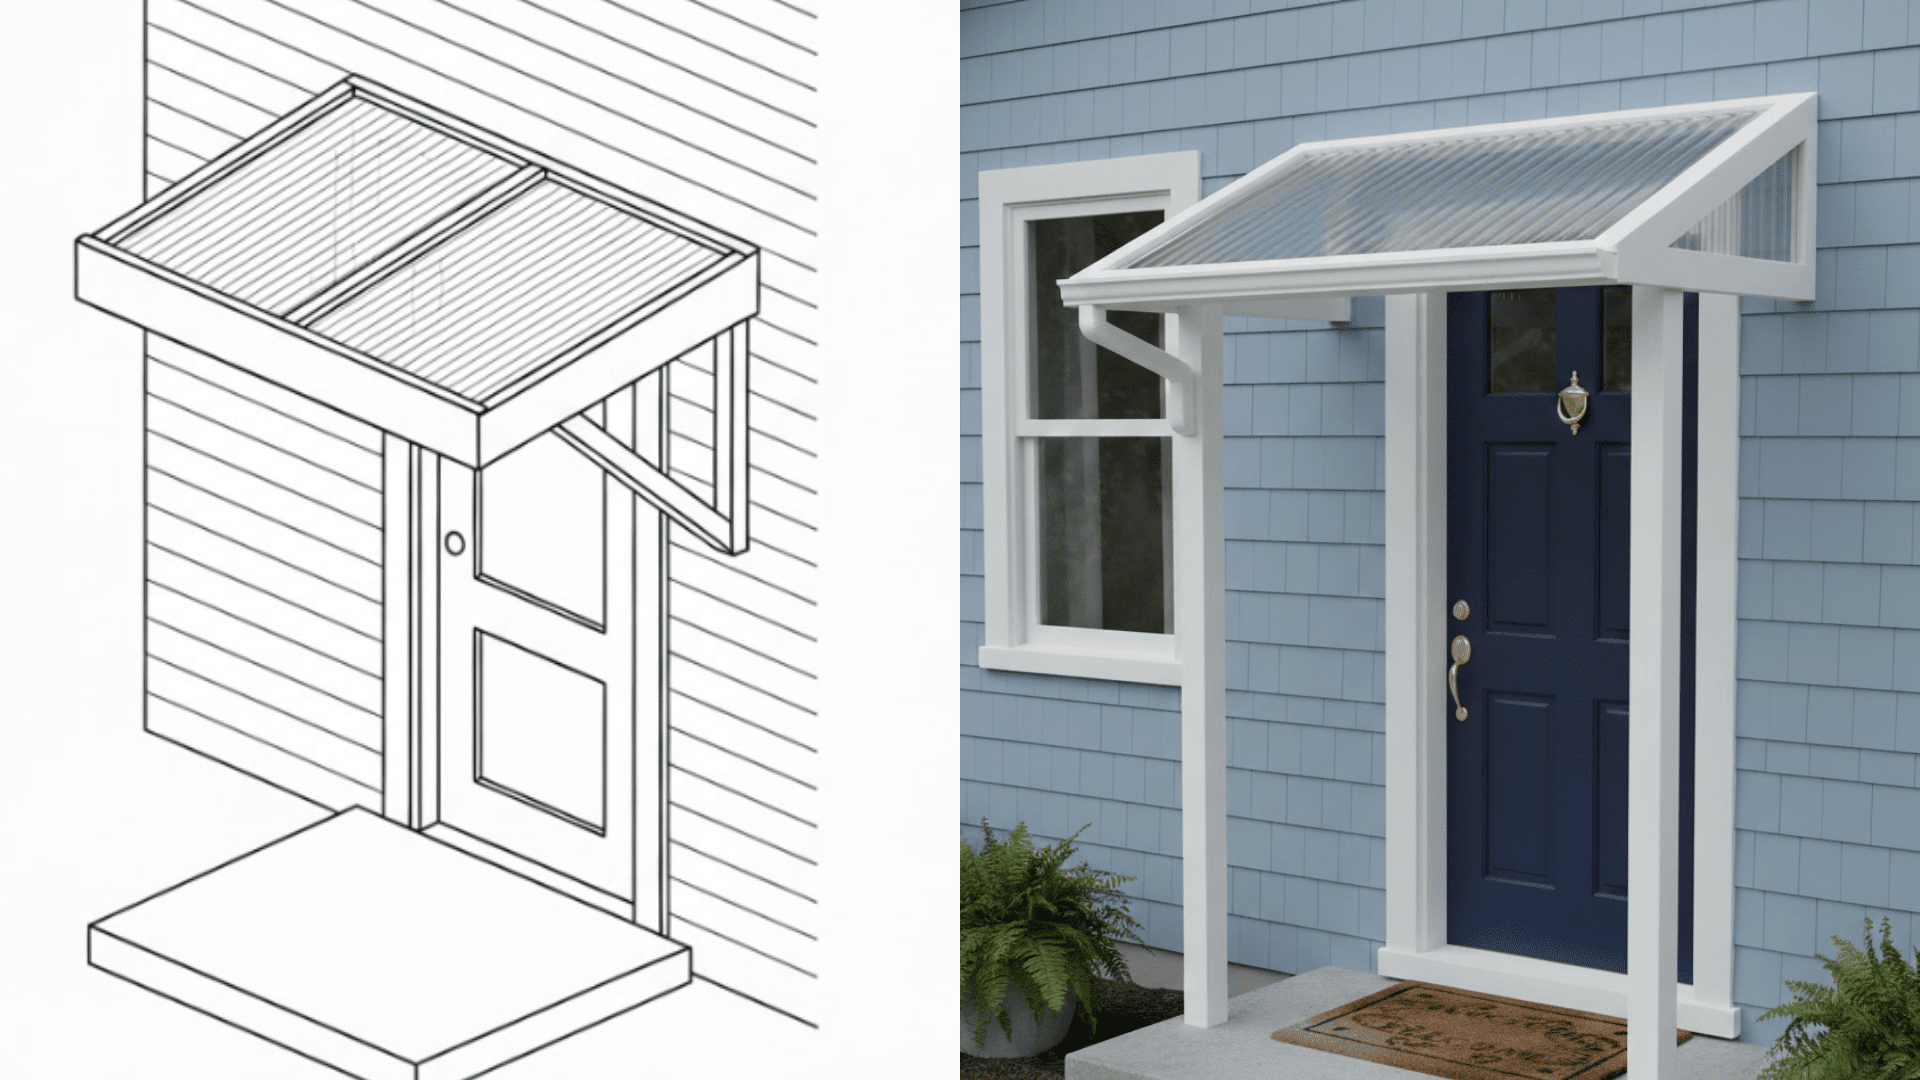
Nobody likes getting soaked while fumbling for keys. A small roof over the front door solves that problem fast. It keeps rain off guests and protects packages from getting drenched.
The compact size means it won’t overpower the home’s look, and installation takes just a day or two. It’s a simple upgrade that makes a real difference.
8. Rain-Free Back Steps Cover
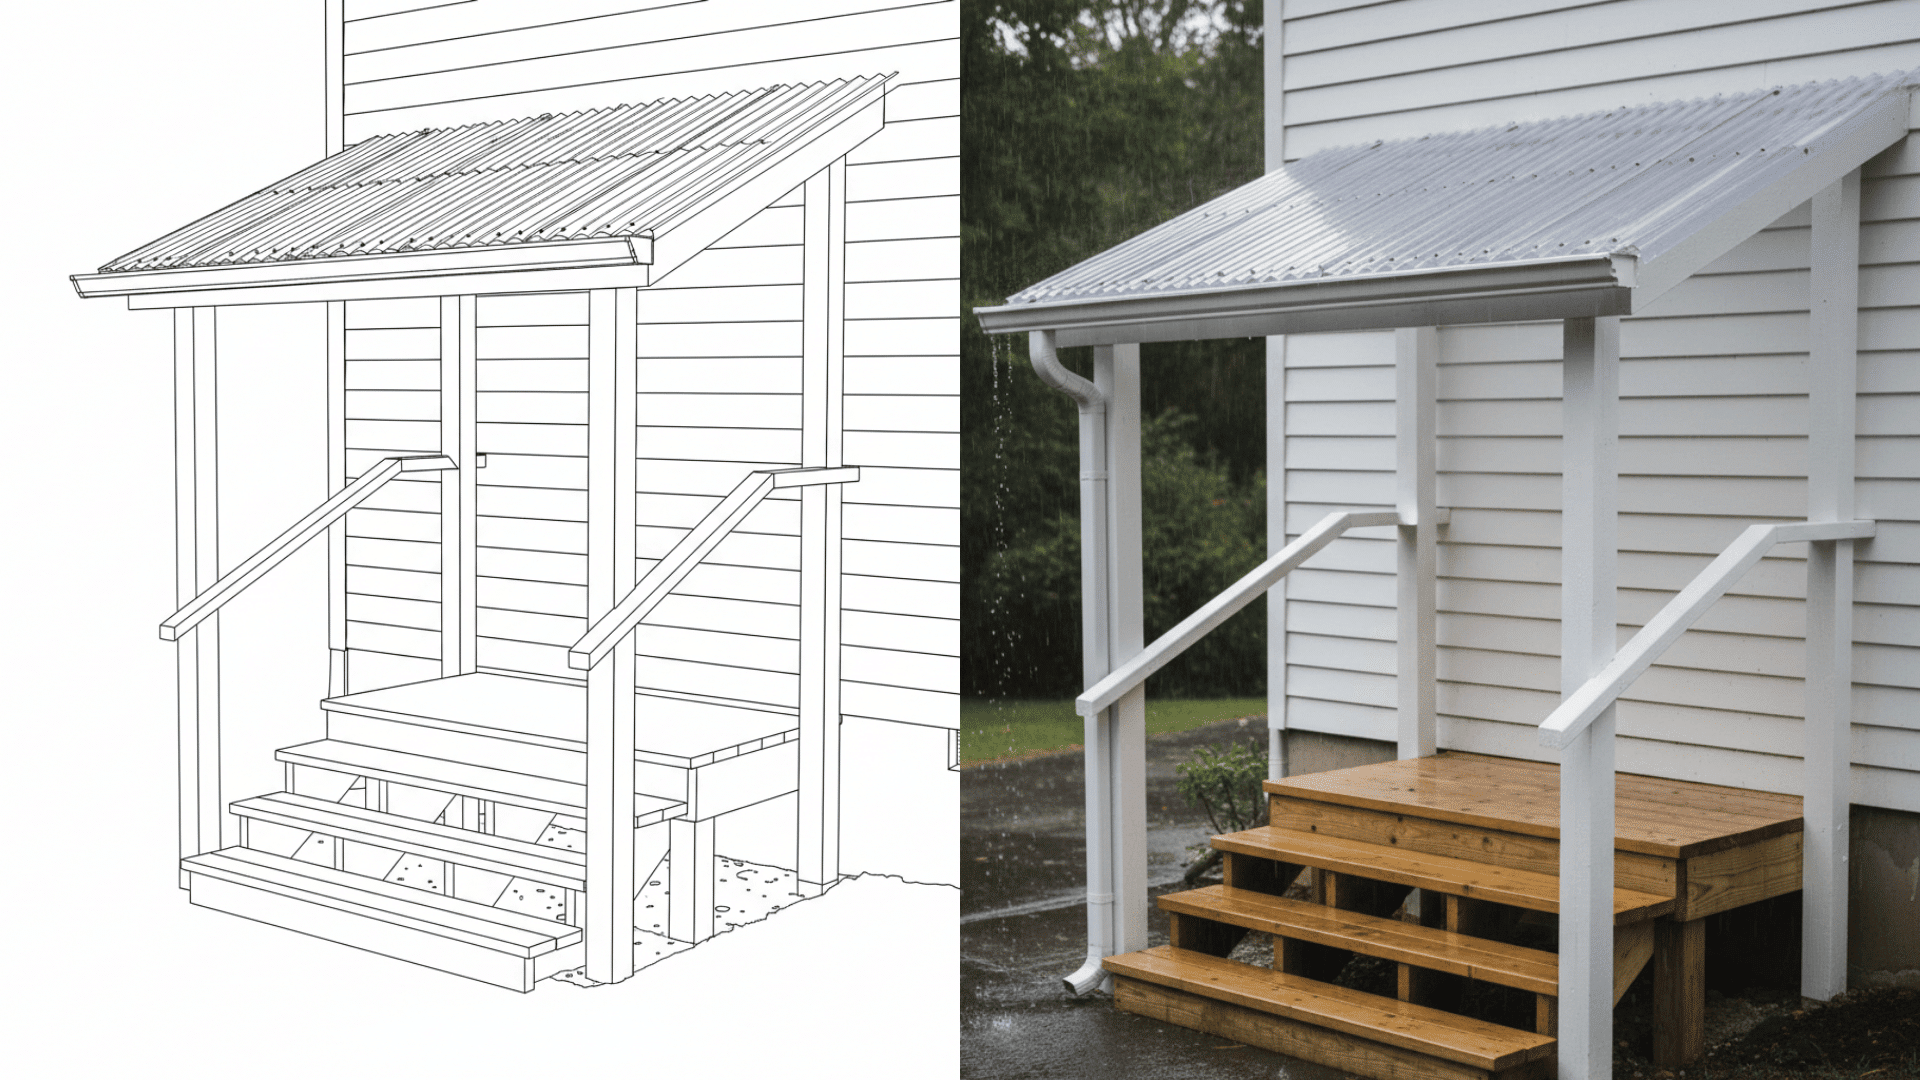
Back steps take a beating from the weather, and wet stairs can be slippery. Adding a lean-to overhead keeps them dry and safer to use.
The structure prevents ice buildup in winter, too. Most designs use posts at the outer edge for support. It’s especially handy when carrying groceries or letting the dog out during storms.
9. Side-Yard Storage Cover
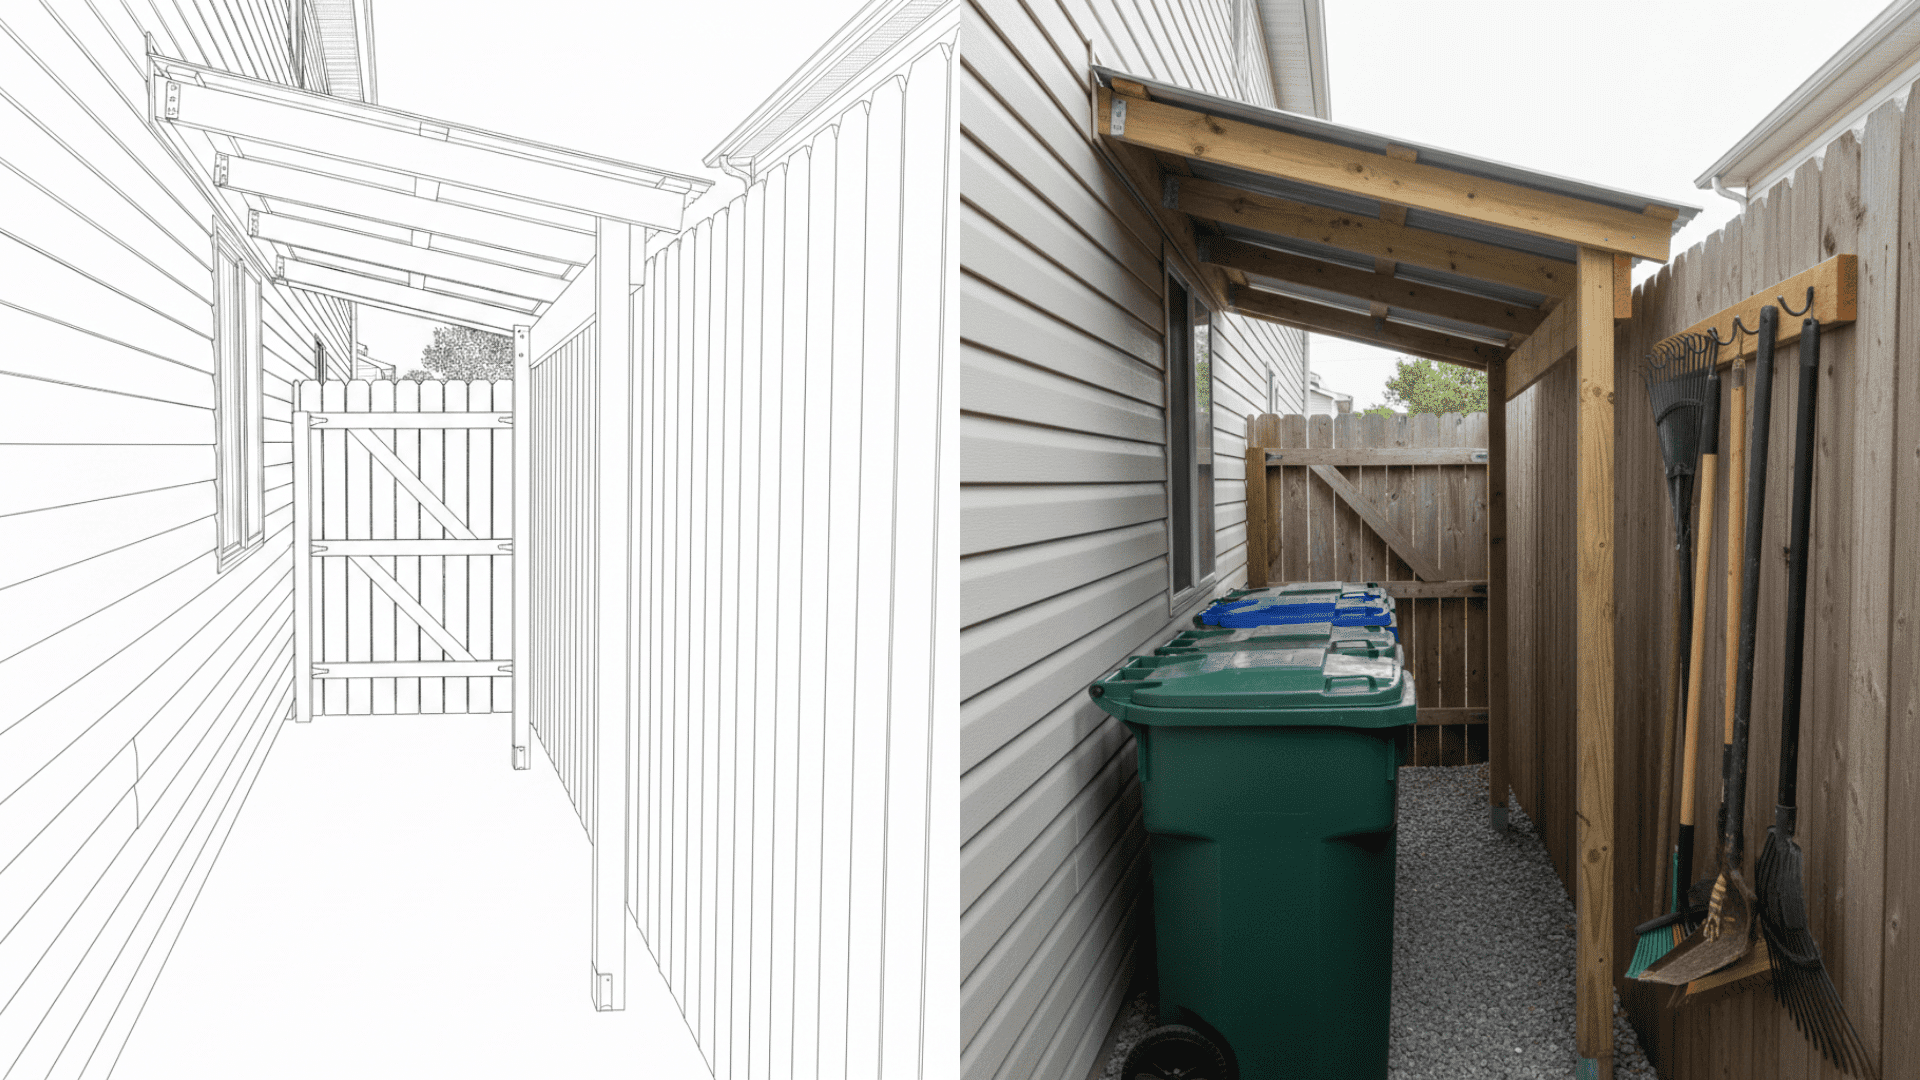
That narrow strip between the house and the fence often goes to waste. A lean-to roof turns it into prime storage real estate. It’s perfect for trash bins, lawn equipment, or seasonal decorations.
The tight space actually makes construction easier since measurements are straightforward. Keeping clutter hidden but accessible makes the whole yard look cleaner and more organized.
10. Garage Workshop Cover
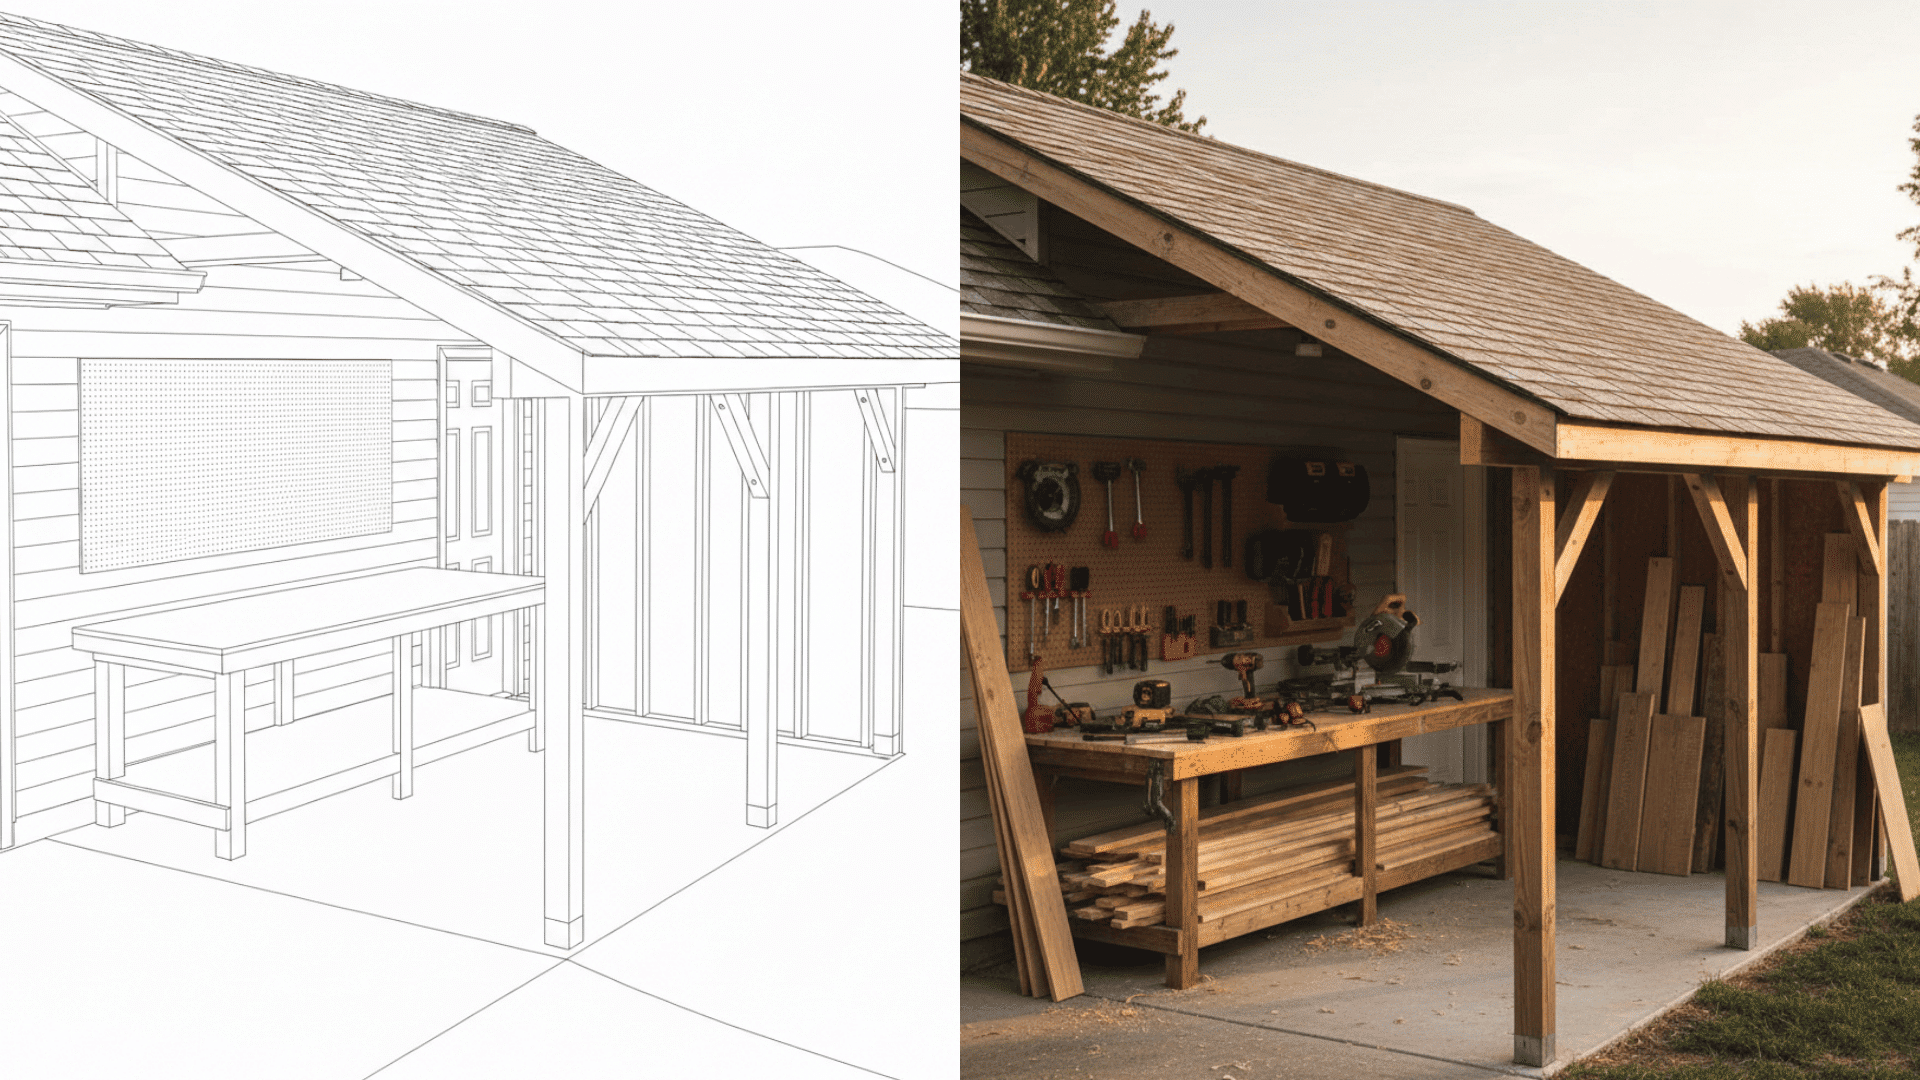
When the garage gets too crowded, a slant roof creates workshop overflow space. It provides shelter for messy projects like woodworking or painting without taking over the main area.
Natural ventilation keeps fumes from building up, and there’s room to spread out materials. Attaching it to the garage wall means power access is close by for tools.
11. Light-and-Shade Lean-To Pergola Roof
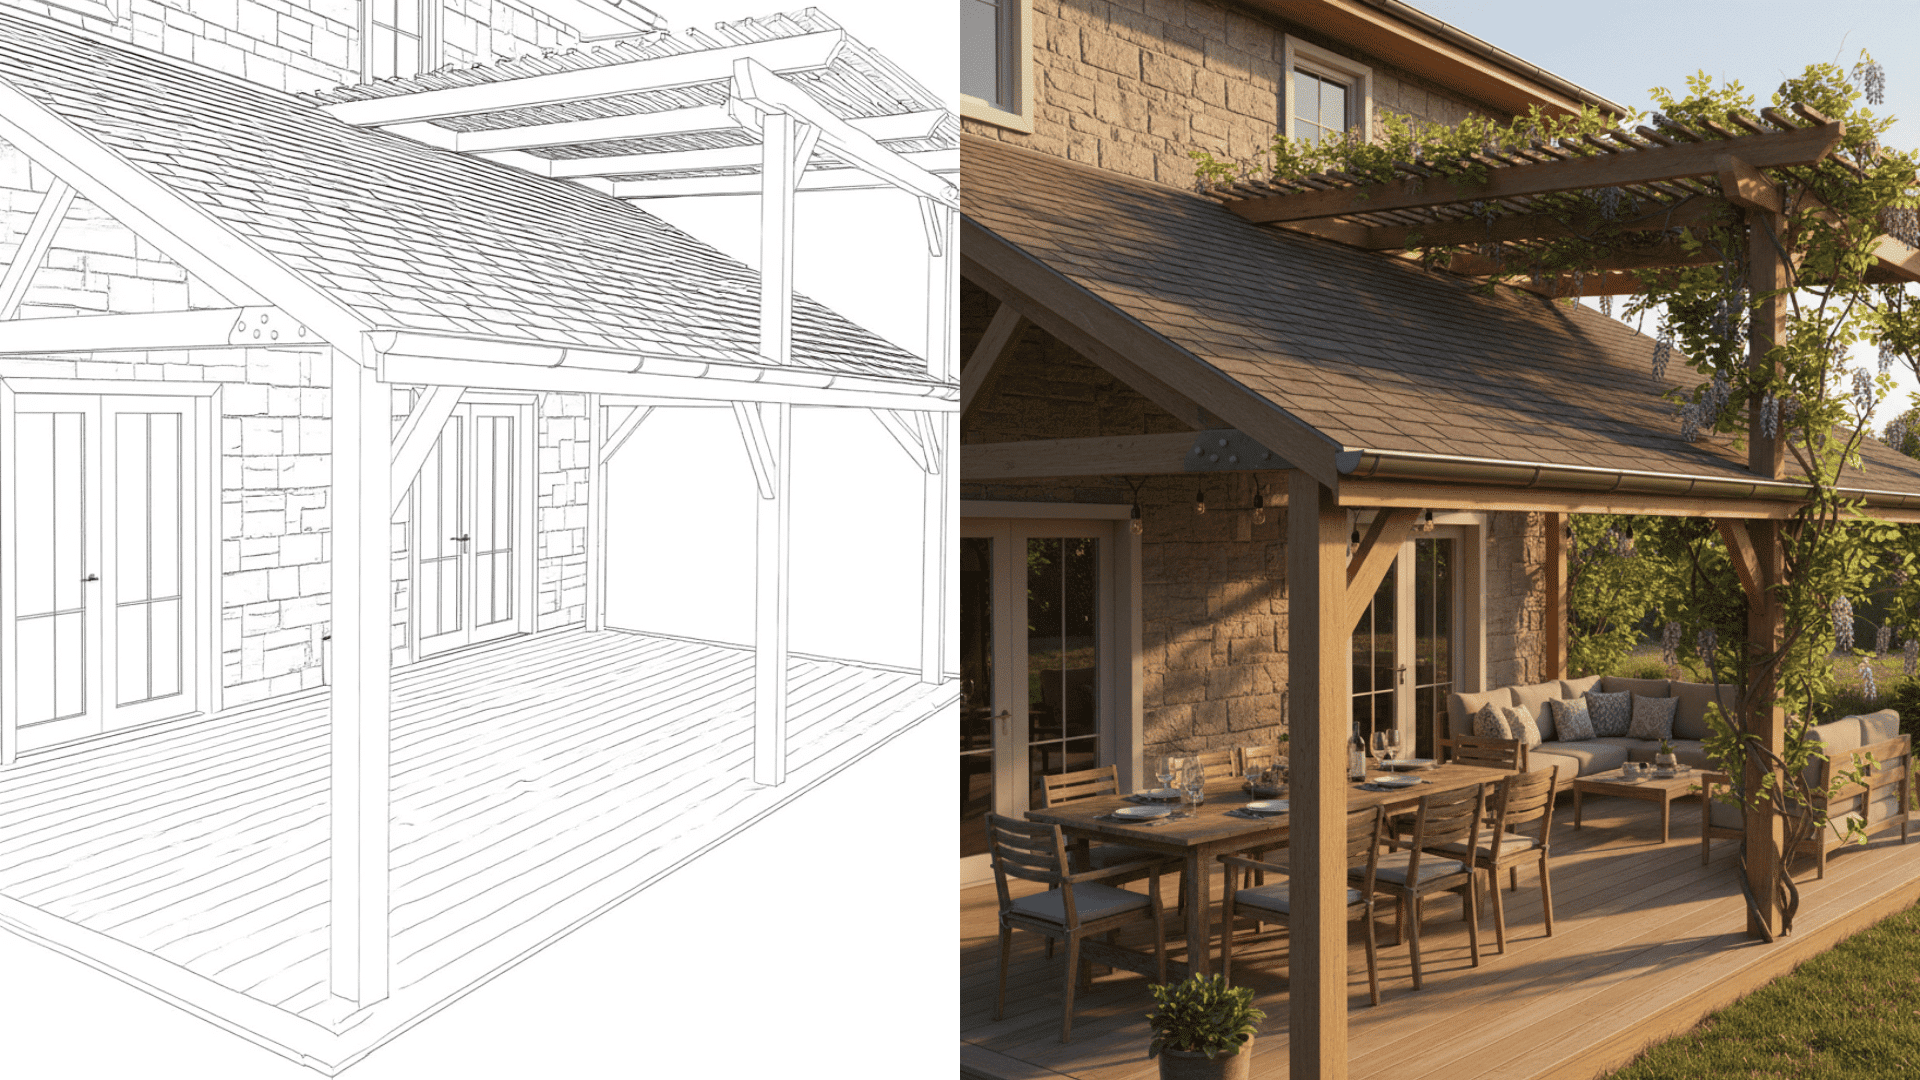
Combining a lean-to roof with pergola-style slats creates the best of both worlds. The solid section blocks harsh sun and rain while open slats let filtered light through.
It adds architectural interest to plain walls and supports climbing plants beautifully. This design works great over decks or outdoor dining areas. The partial coverage keeps things comfortable without feeling too enclosed.
These ideas prove that function and simplicity can go hand in hand. Whether someone’s looking to protect equipment, expand workspace, or create a cozy outdoor spot, there’s a design that fits.
Tools and Materials Needed
Before starting the build, gathering the right tools and materials helps the project move faster and prevents delays once framing begins.
| Item | Purpose |
|---|---|
| Tape measure + pencil | Layout and cut marks. |
| Level + string line | Keep ledger/posts straight. |
| Post-hole digger | Dig post holes. |
| Saw | Cut lumber. |
| Drill/driver | Fasten screws/connectors. |
| Ladder | Reach the wall/roof safely. |
| 2×6 lumber | Wall ledger + front beam. |
| 4×4 posts + concrete | Support the roof edge and set posts. |
| 2×4 lumber + rafter ties | Build and secure rafters. |
| 1×4 purlins | Support roofing panels. |
| Metal panels + self-tapping screws | Install the roof covering. |
| Wood-to-metal screws | Attach the ledger to the steel studs. |
Step-by-Step: How to Build a Lean-to Roof
Each step focuses on practical actions that keep the structure straight, secure, and weather-ready. The steps below explain how a lean-to roof is built from start to finish.
Step 1: Install the Wall Ledger Board
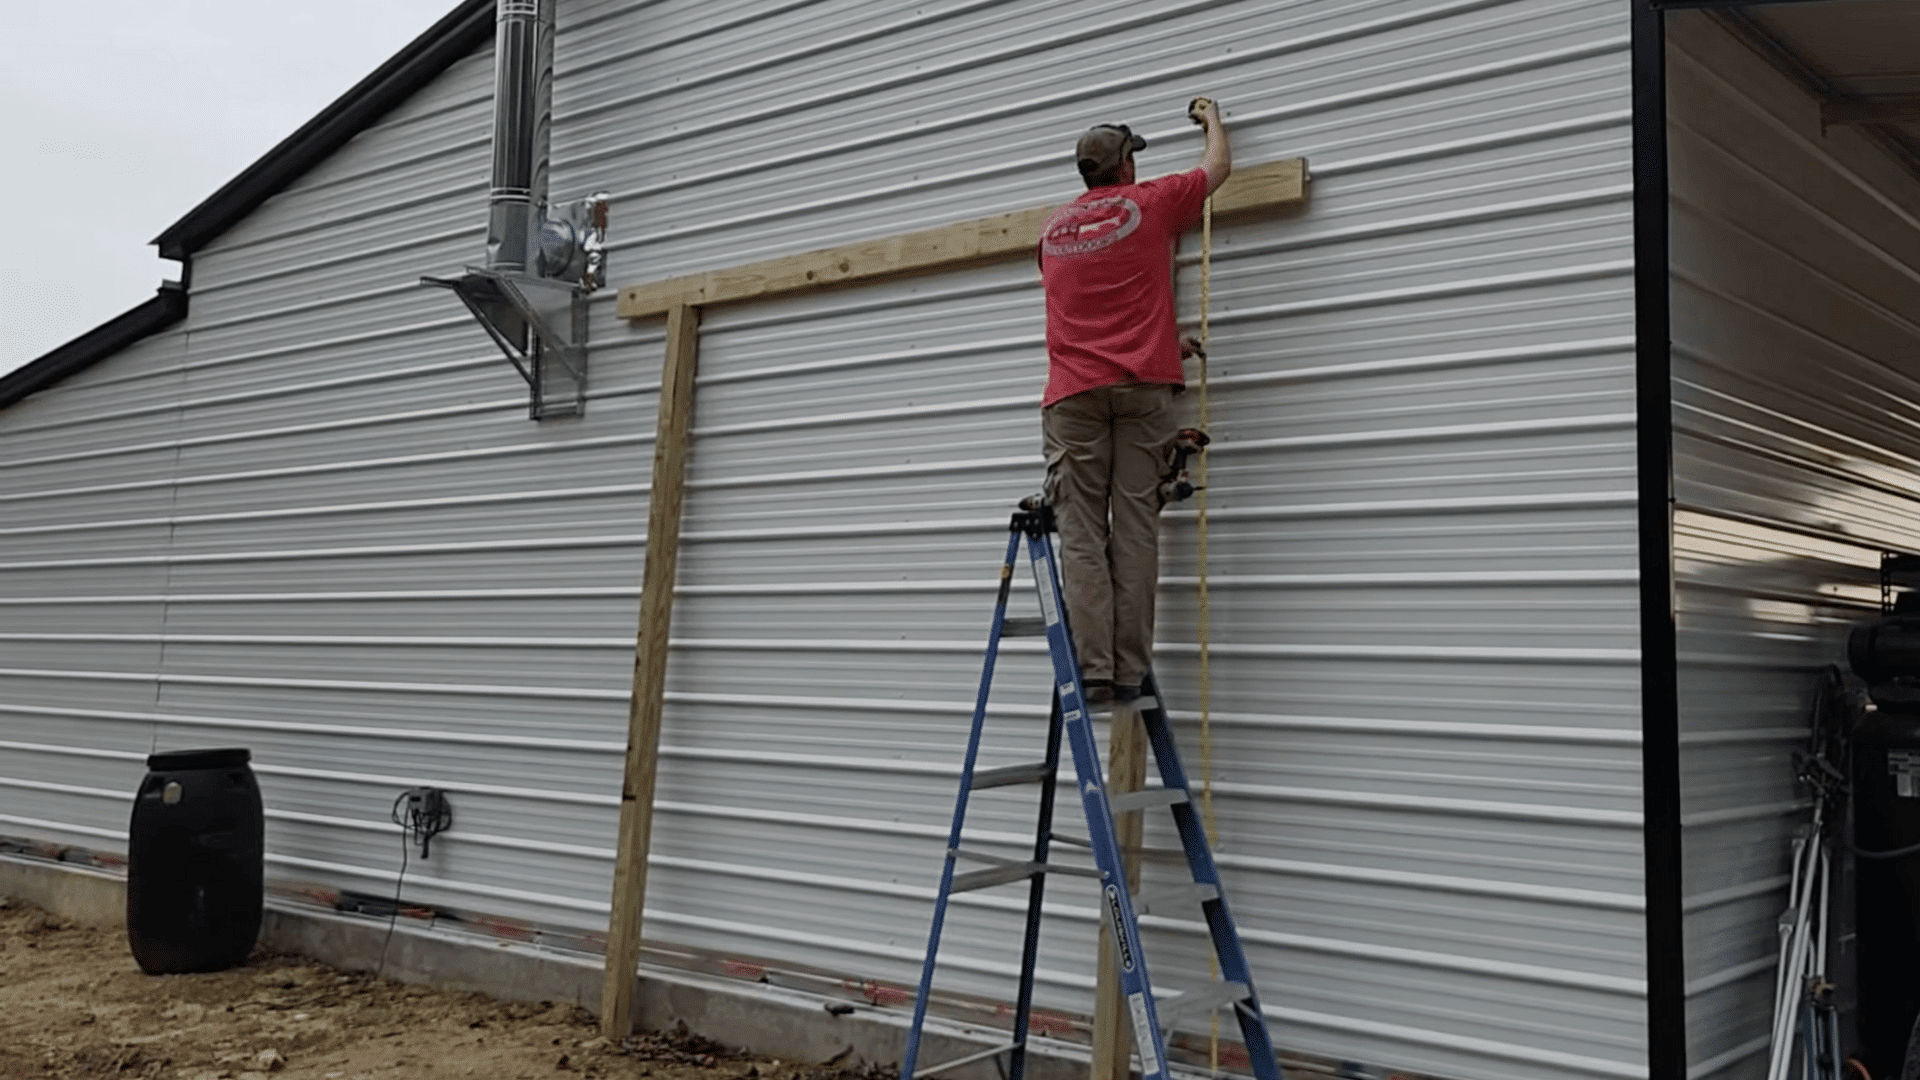
Begin by positioning a 12-foot 2×6 ledger on the shop wall so it spans multiple steel studs. Use temporary 4×4 props to hold the board in place while measuring, marking the height, and confirming it is perfectly level.
Fasten the ledger with heavy-duty wood-to-metal screws to create a strong, reliable anchor point. Double-check the level before tightening every screw.
Step 2: Mark Post Locations and Dig Holes

Stretch a string line along the planned outer edge to keep the layout straight. Mark each post location using the string as a guide, then dig holes with a post-hole digger.
Exact hole depth does not need to match because post tops can be trimmed later to create a clean, consistent roof line. Keep the string line tight to avoid a bowed layout.
Step 3: Set Posts in Concrete and Add the Front Beam
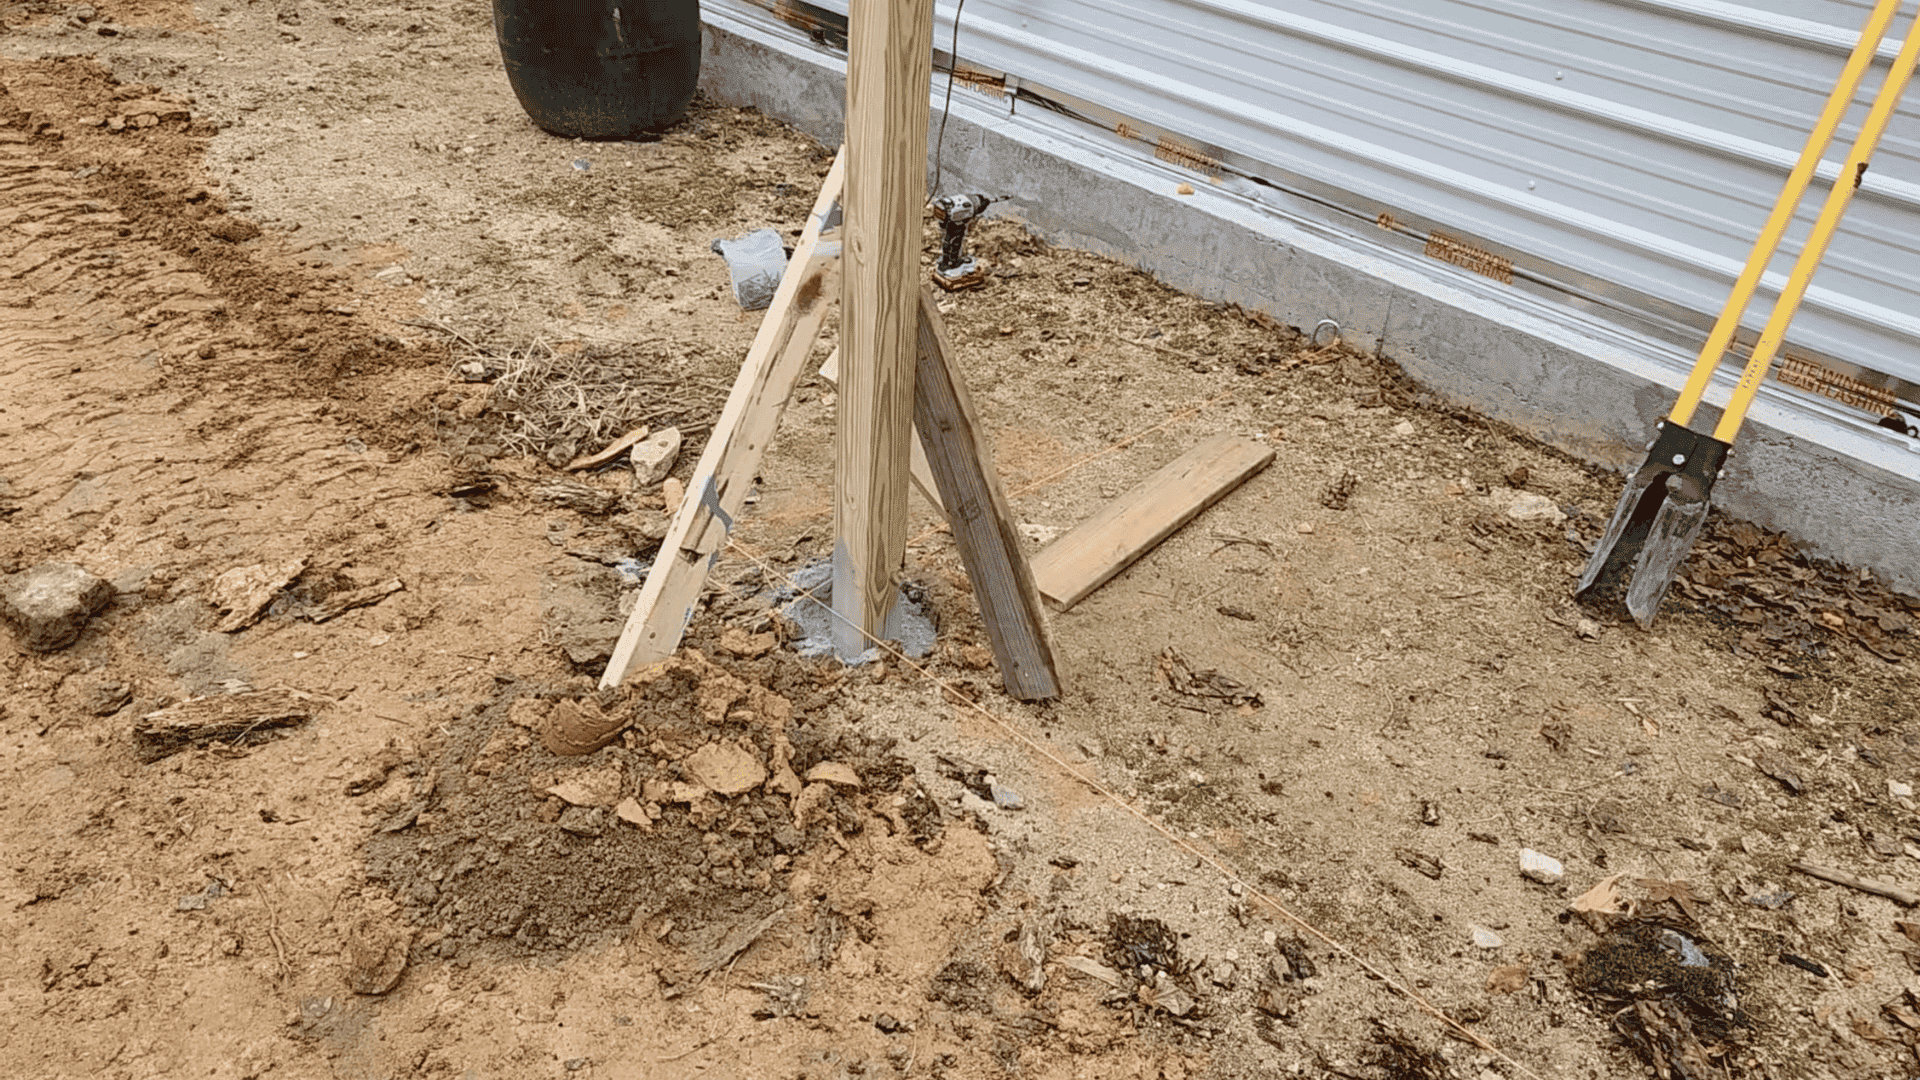
Place each 4×4 post in its hole, check plumb with a level, and brace with scrap wood to prevent movement. Pour concrete around the posts and allow full curing.
Attach a 2×6 front beam across the posts, then trim post tops to the final height so the beam sits even and stable. Recheck plumbing after the concrete is placed.
Step 4: Cut and Install Rafters with Consistent Spacing
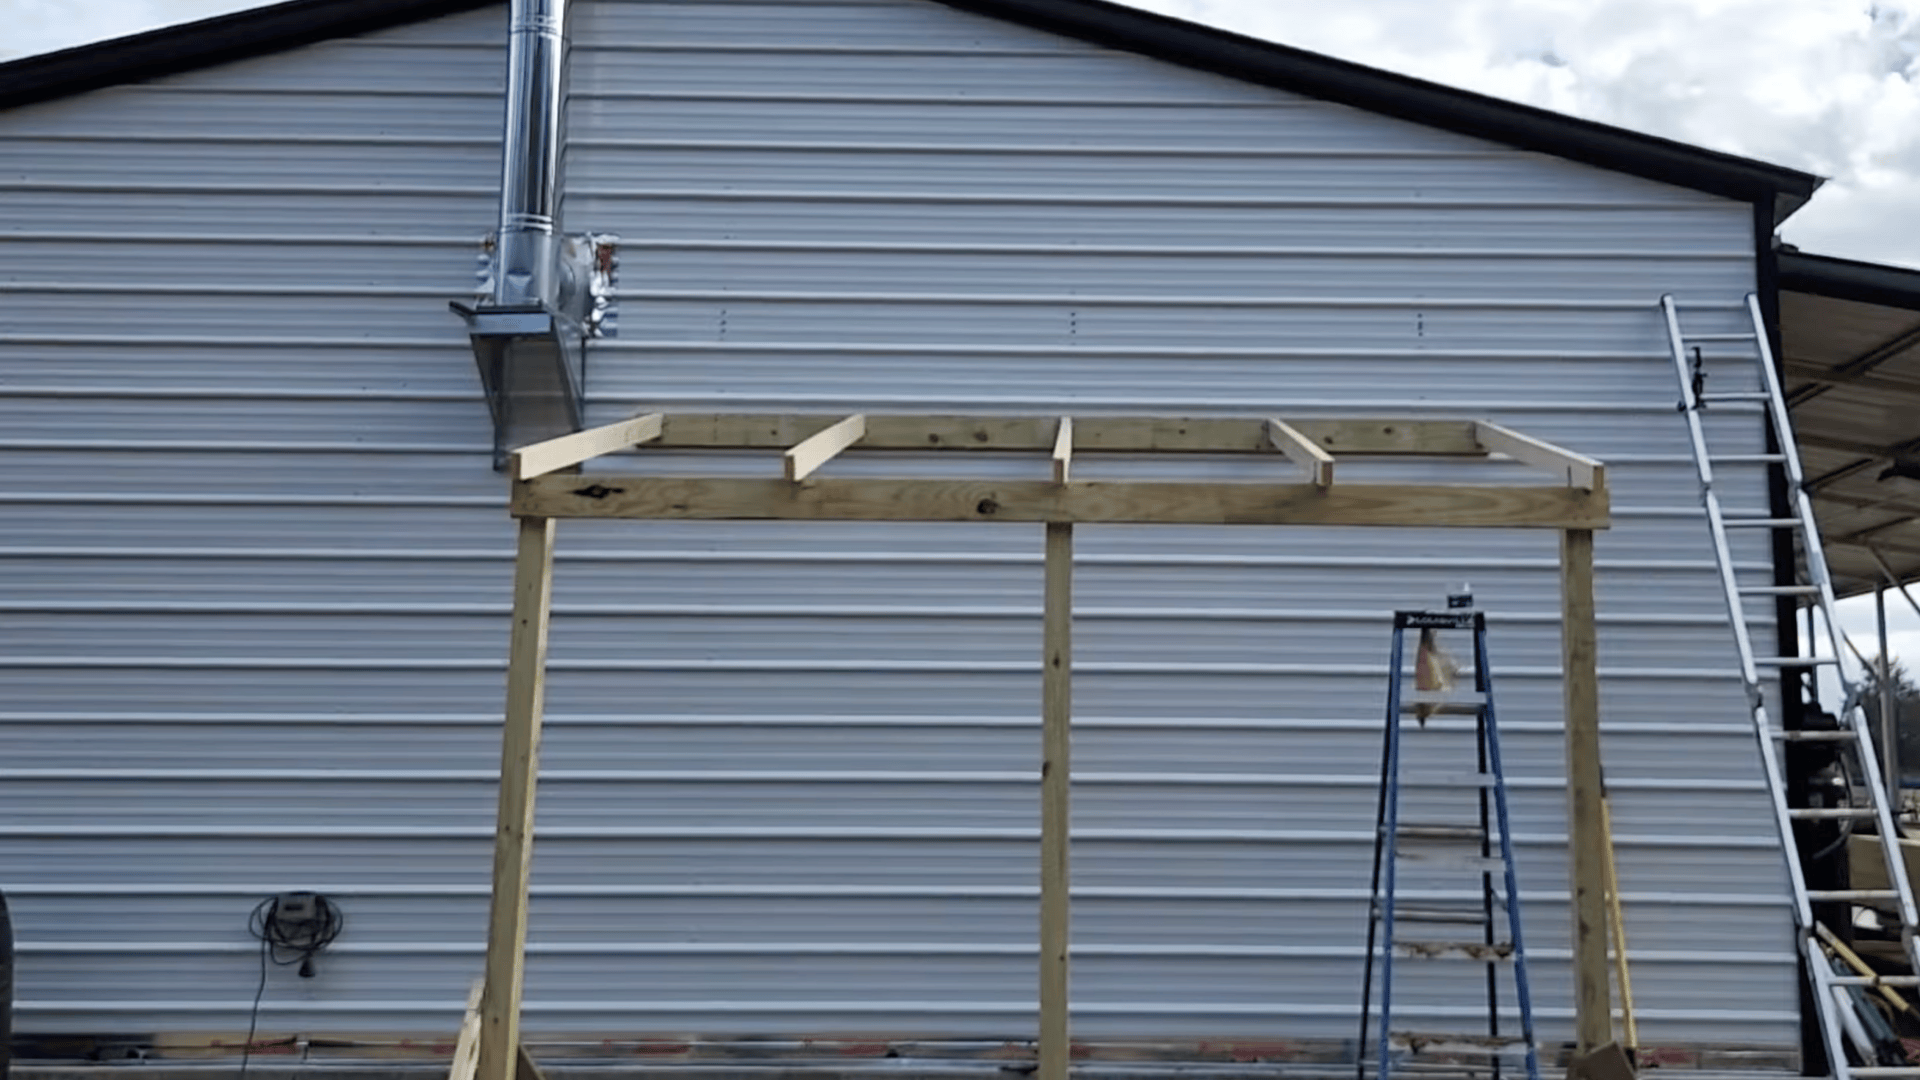
Use 2x4s for rafters and mark the angle by holding a rafter board against the wall ledger, then transfer the cut line for accuracy. Cut rafters to length at a miter saw station.
Install rafter ties at the ledger, set rafters in place, and use a spacer block at the front beam to keep spacing uniform. Make sure each rafter seats fully in its connector.
Step 5: Install Purlins and Secure the Roofing Panels
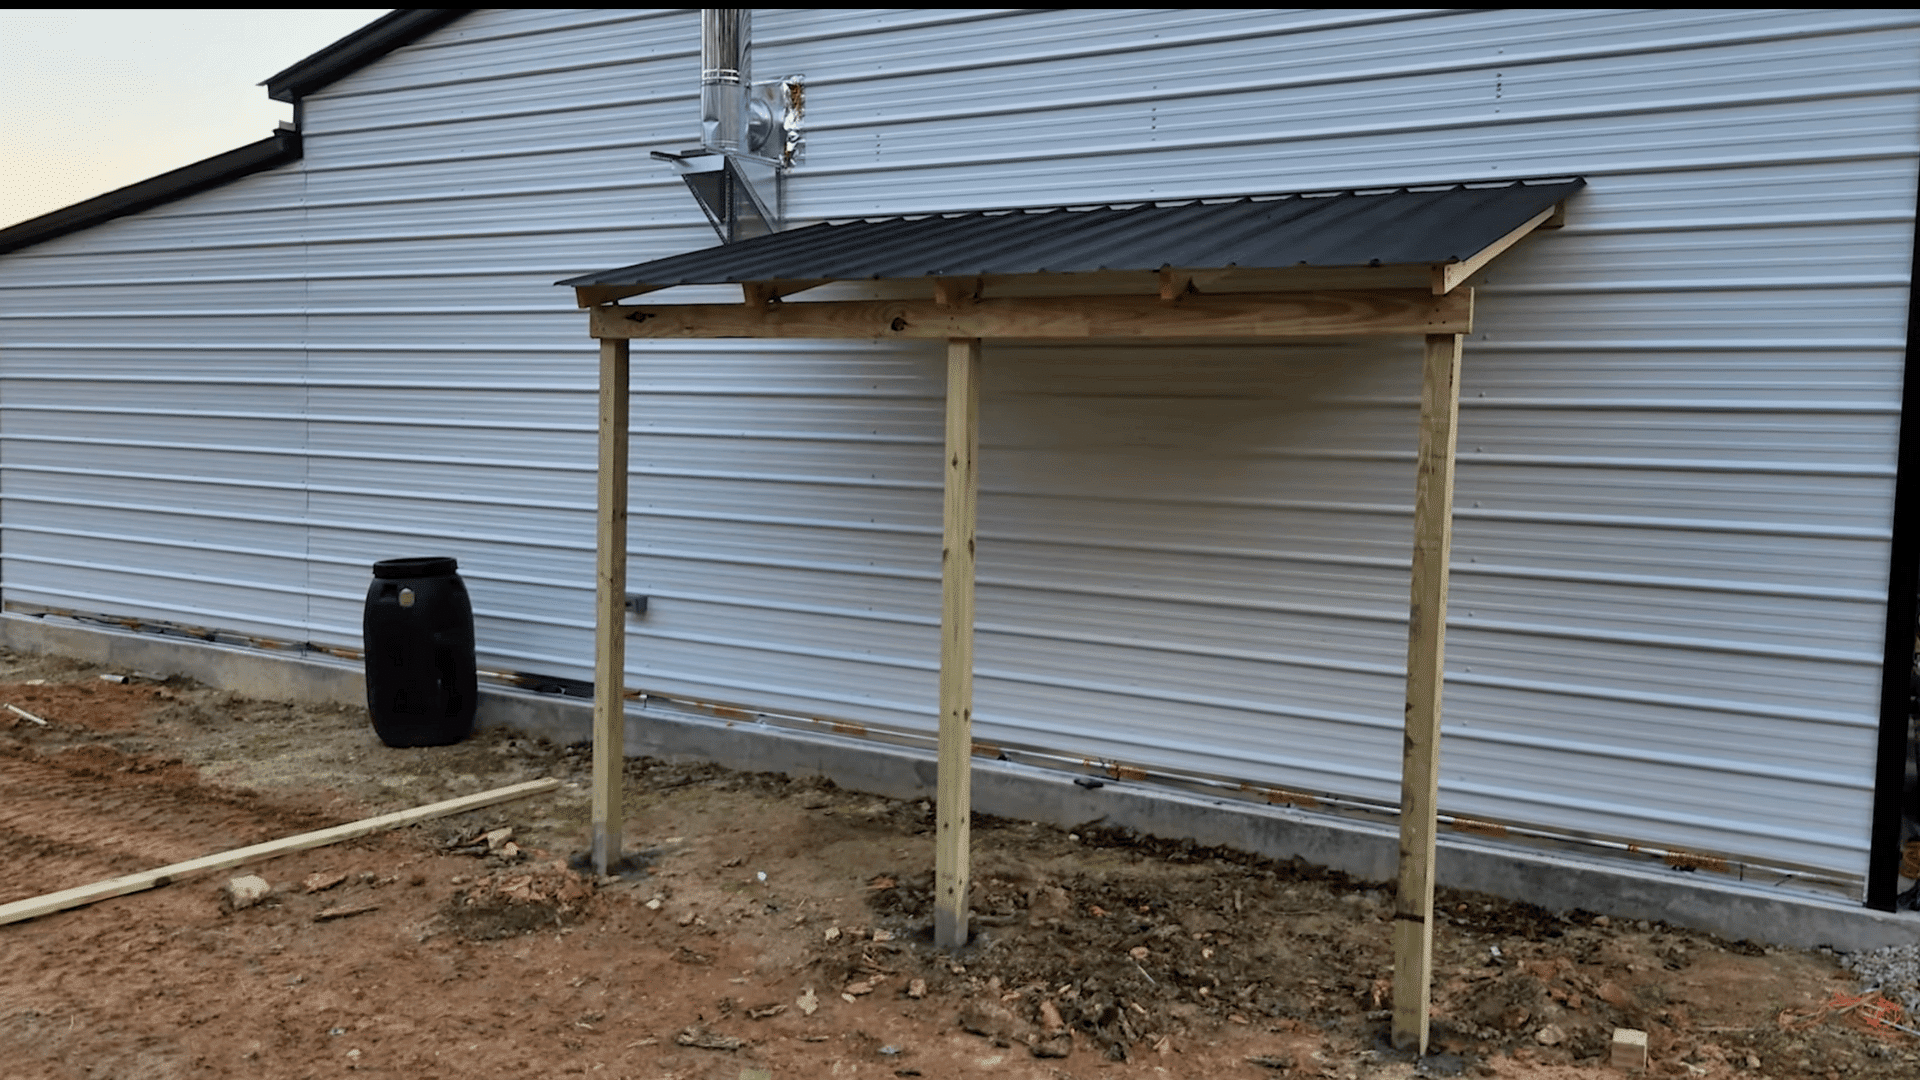
Fasten 12-foot 1×4 purlins across the rafters, spacing them evenly for consistent roof support. Lift roofing panels onto the frame, leaving about a 2-inch overhang on the sides and a 4-inch overhang at the front.
Secure panels with self-tapping roofing screws for a tight, weather-resistant finish. Start panel placement from one end to keep rows straight.
After the roof panels are secured, the lean-to is ready to protect tools, firewood, or a covered work area. A final check for straight lines, tight fasteners, and clean overhangs helps it perform well in rain and wind.
For more detailed instructions, refer to the YouTube video by PatriotDIY below:
Maintenance and Care Tips
Once a lean-to roof is up and running, it doesn’t need constant attention. But a little regular care goes a long way in keeping it functional and looking good. These simple maintenance steps help avoid bigger problems down the road.
- Check for debris buildup regularly: Leaves, branches, and dirt collect on flat or low-slope areas. Clearing them off prevents water pooling and potential leaks.
- Inspect the attachment points yearly: The connection to the main structure takes the most stress. Tighten loose bolts and check for gaps or separation.
- Clean gutters if installed: Clogged gutters defeat the whole drainage system. A quick cleanout keeps water flowing where it should.
- Look for rust or rot signs: Catching small issues early saves money. Touch up paint or seal problem spots before they spread.
- Trim overhanging branches back: Trees dropping debris or scraping the roof during wind cause unnecessary wear. A little trimming prevents damage.
Final Thoughts
Lean-to roof ideas offer practical solutions for anyone looking to maximize their property’s potential. These structures deliver real value without breaking the bank, and the DIY-friendly designs mean people can tackle many projects themselves.
From protecting vehicles to creating cozy outdoor spaces, the right lean-to roof adapts to whatever needs come up. The construction process might seem intimidating at first, but it’s more straightforward than most people think.
With proper planning and basic tools, changing an unused area becomes totally achievable. Ready to put one of these ideas into action?
Start by measuring the space and sketching out a simple plan. The hardest part is often just getting started. Sometimes all it takes is that first step to turn an overlooked corner into something genuinely useful.