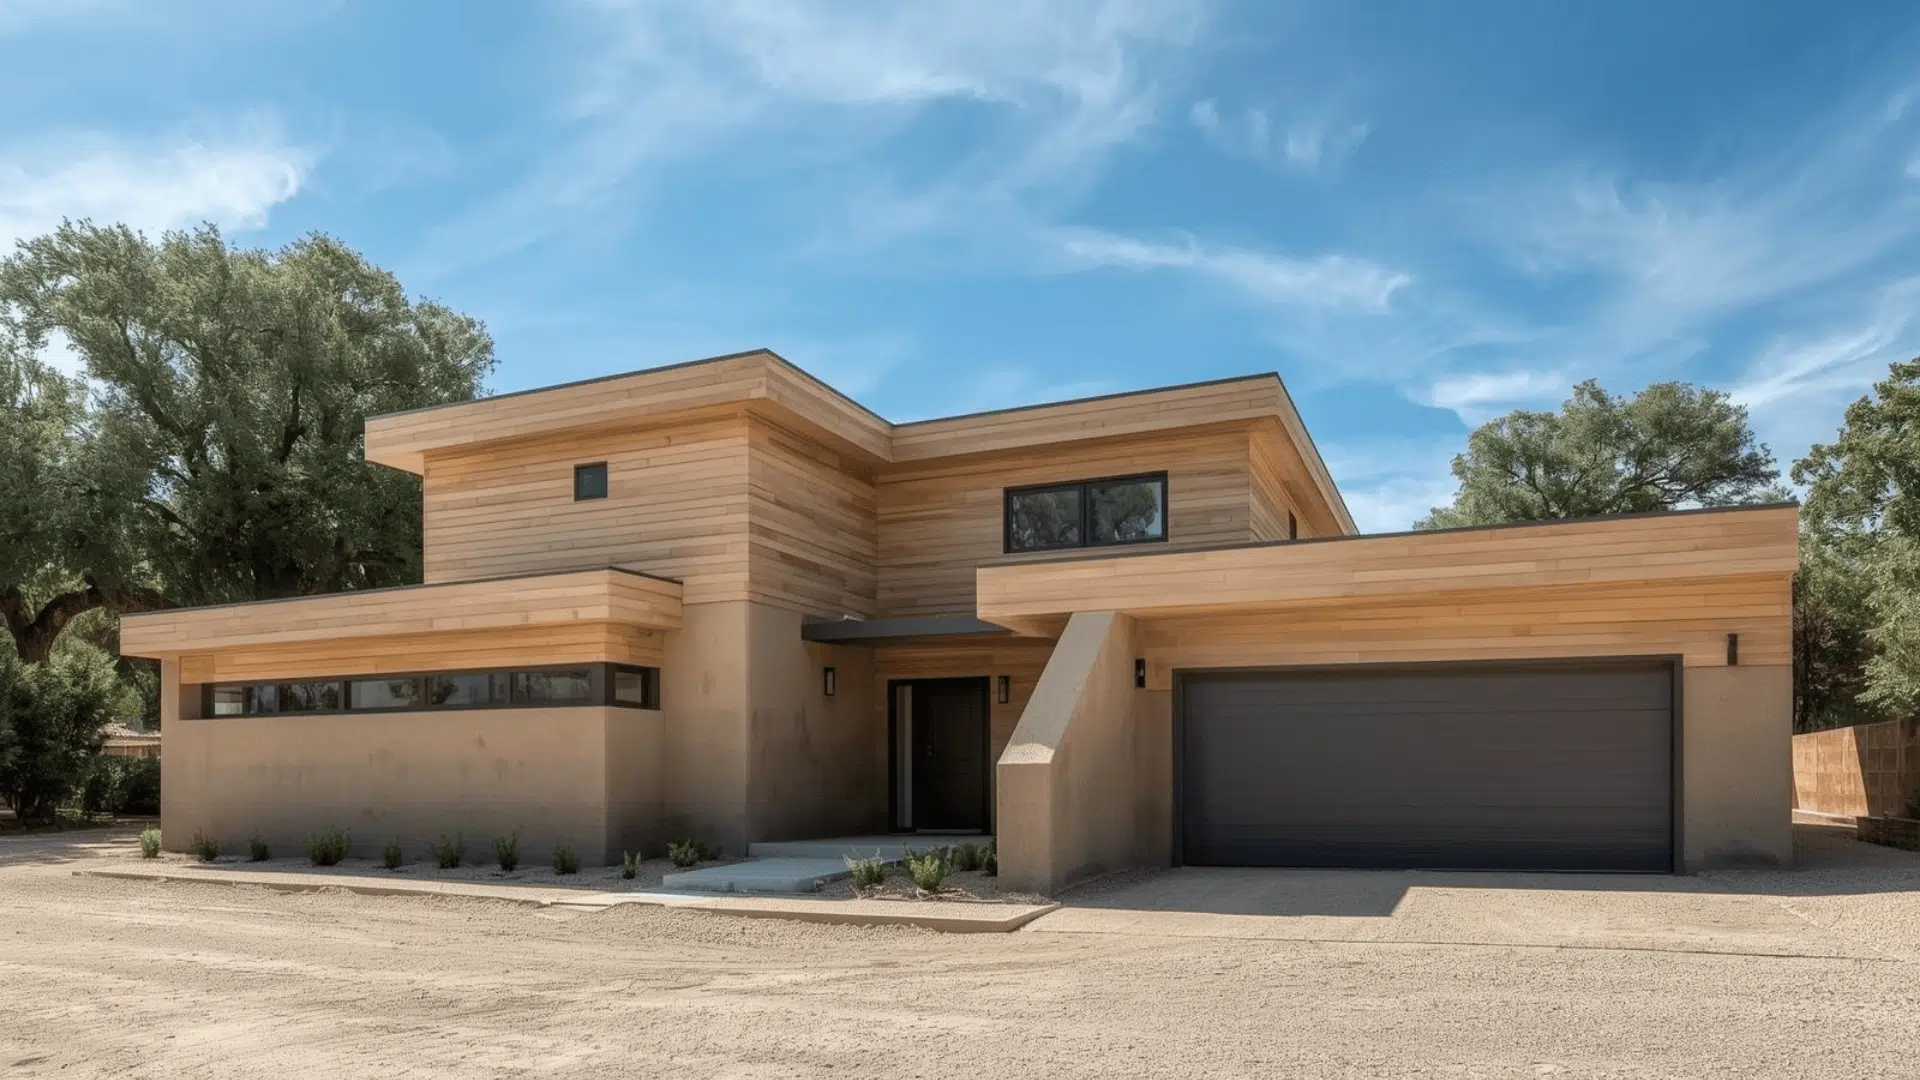
Builders are turning back to an old method that’s catching fire right now: rammed earth. It’s durable. It’s natural. And it works in ways modern materials might miss.
But getting the details right matters more than people think. A wall that lasts generations doesn’t happen by chance – it comes from understanding how earth, water, and structure work together.
You’ll find everything you need to know about rammed earth construction details that actually make a difference. We’re talking wall-building techniques, the right materials, and how to handle moisture properly.
You’ll get the scoop on structural support, insulation options, and step-by-step notes for your build.
Whether you’re planning your first project or looking to improve your technique, these details will help you build walls that stand strong for years to come.
What Is Rammed Earth Construction?
Rammed earth construction uses slightly damp soil compacted within temporary wooden frames. Think of it like making a giant sandcastle, but much stronger.
Workers add the soil in thin layers – usually about six inches at a time. Then they pound it down with heavy tools until it’s solid. Each layer is compressed before the next layer is applied.
The frames hold everything in place while you work. Once the wall is dry and hard, remove the frames.
What’s left is a thick, solid wall made entirely from earth. The layers create a striped pattern that many people find beautiful.
What Does Rammed Earth Construction Look Like?
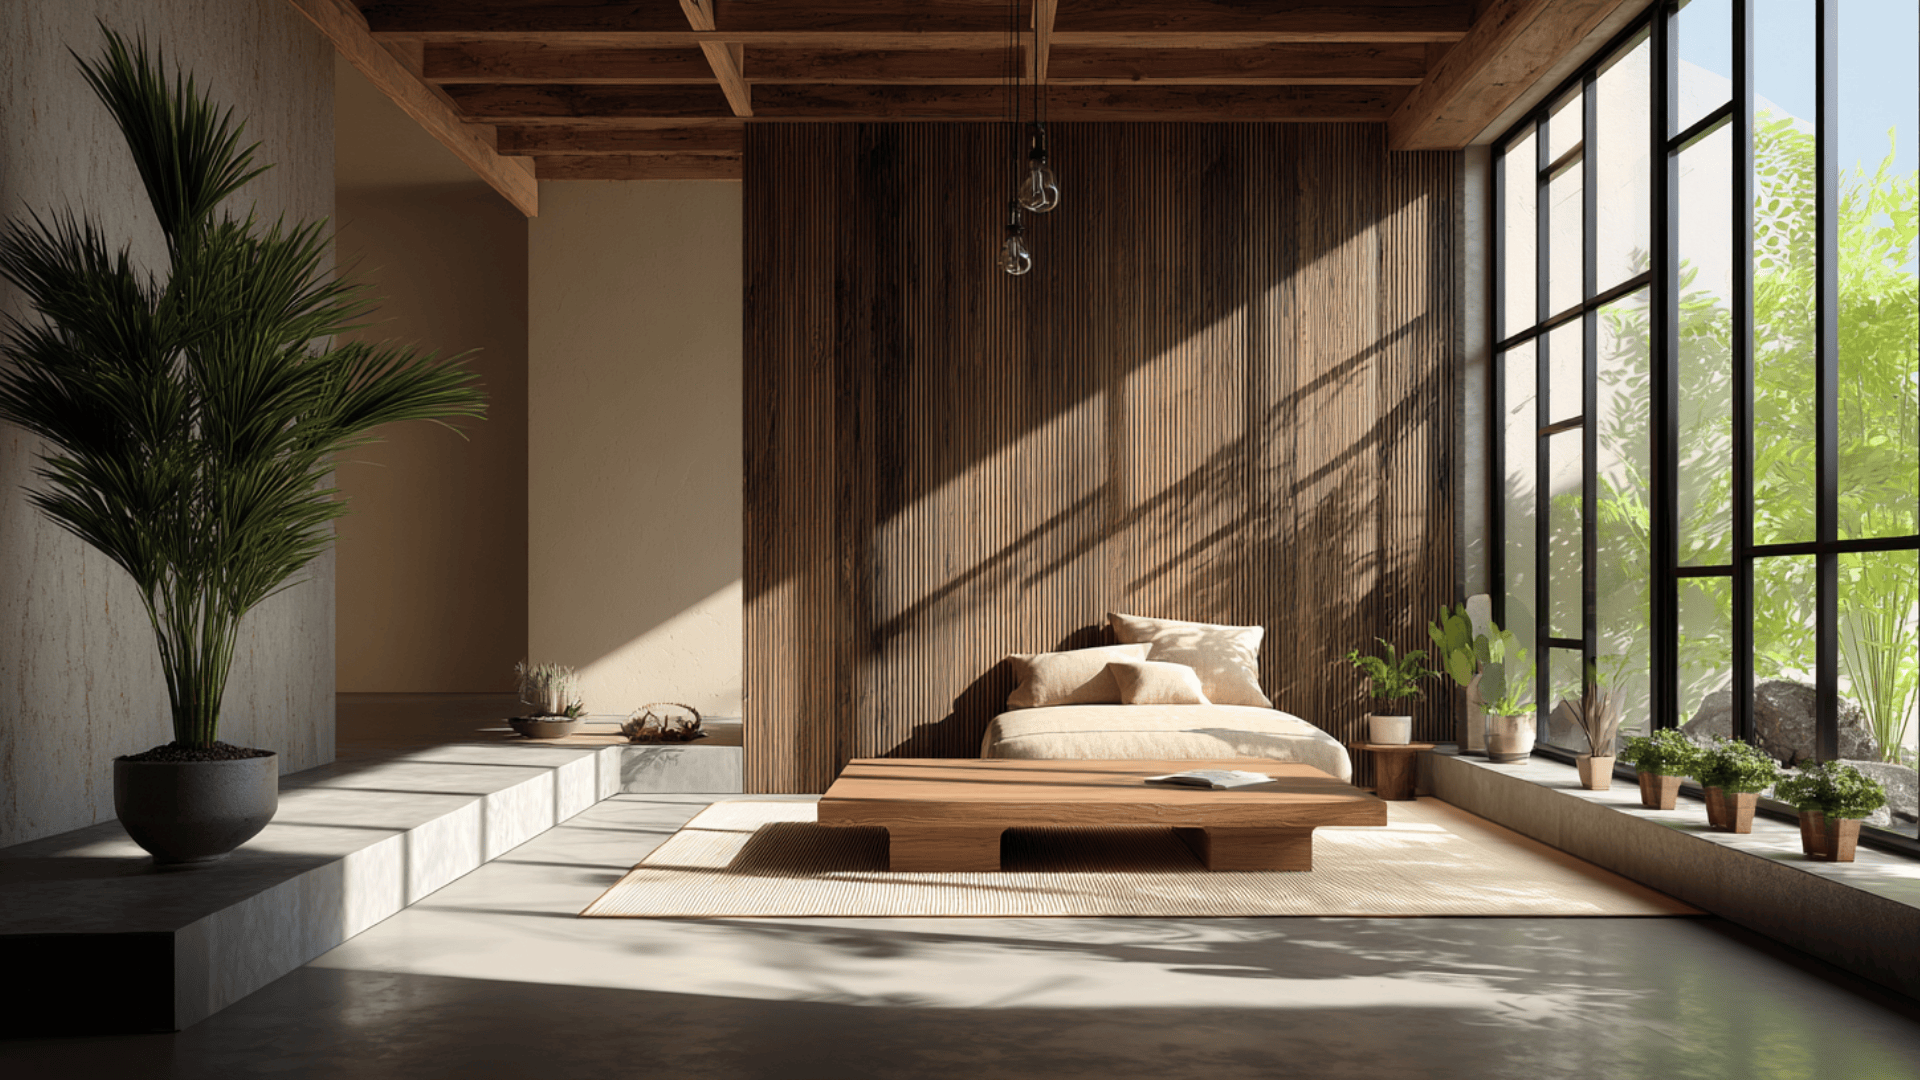
Rammed-earth walls have a look you won’t find anywhere else. The natural materials and building process create unique features that make each building special.
Here’s what you’ll see when you look at a rammed-earth wall.
| Feature | What You’ll See |
|---|---|
| Color Banding | Natural horizontal stripes in shades of tan, brown, red, or gray, depending on the soil used. |
| Layer Lines | Visible lines between each compacted layer show how the wall was built up over time. |
| Form Tie Marks | Small circular indentations on the wall surface where wooden forms were held together. |
| Surface Finish | Can be smooth and polished or rough and textured, based on builder’s preference. |
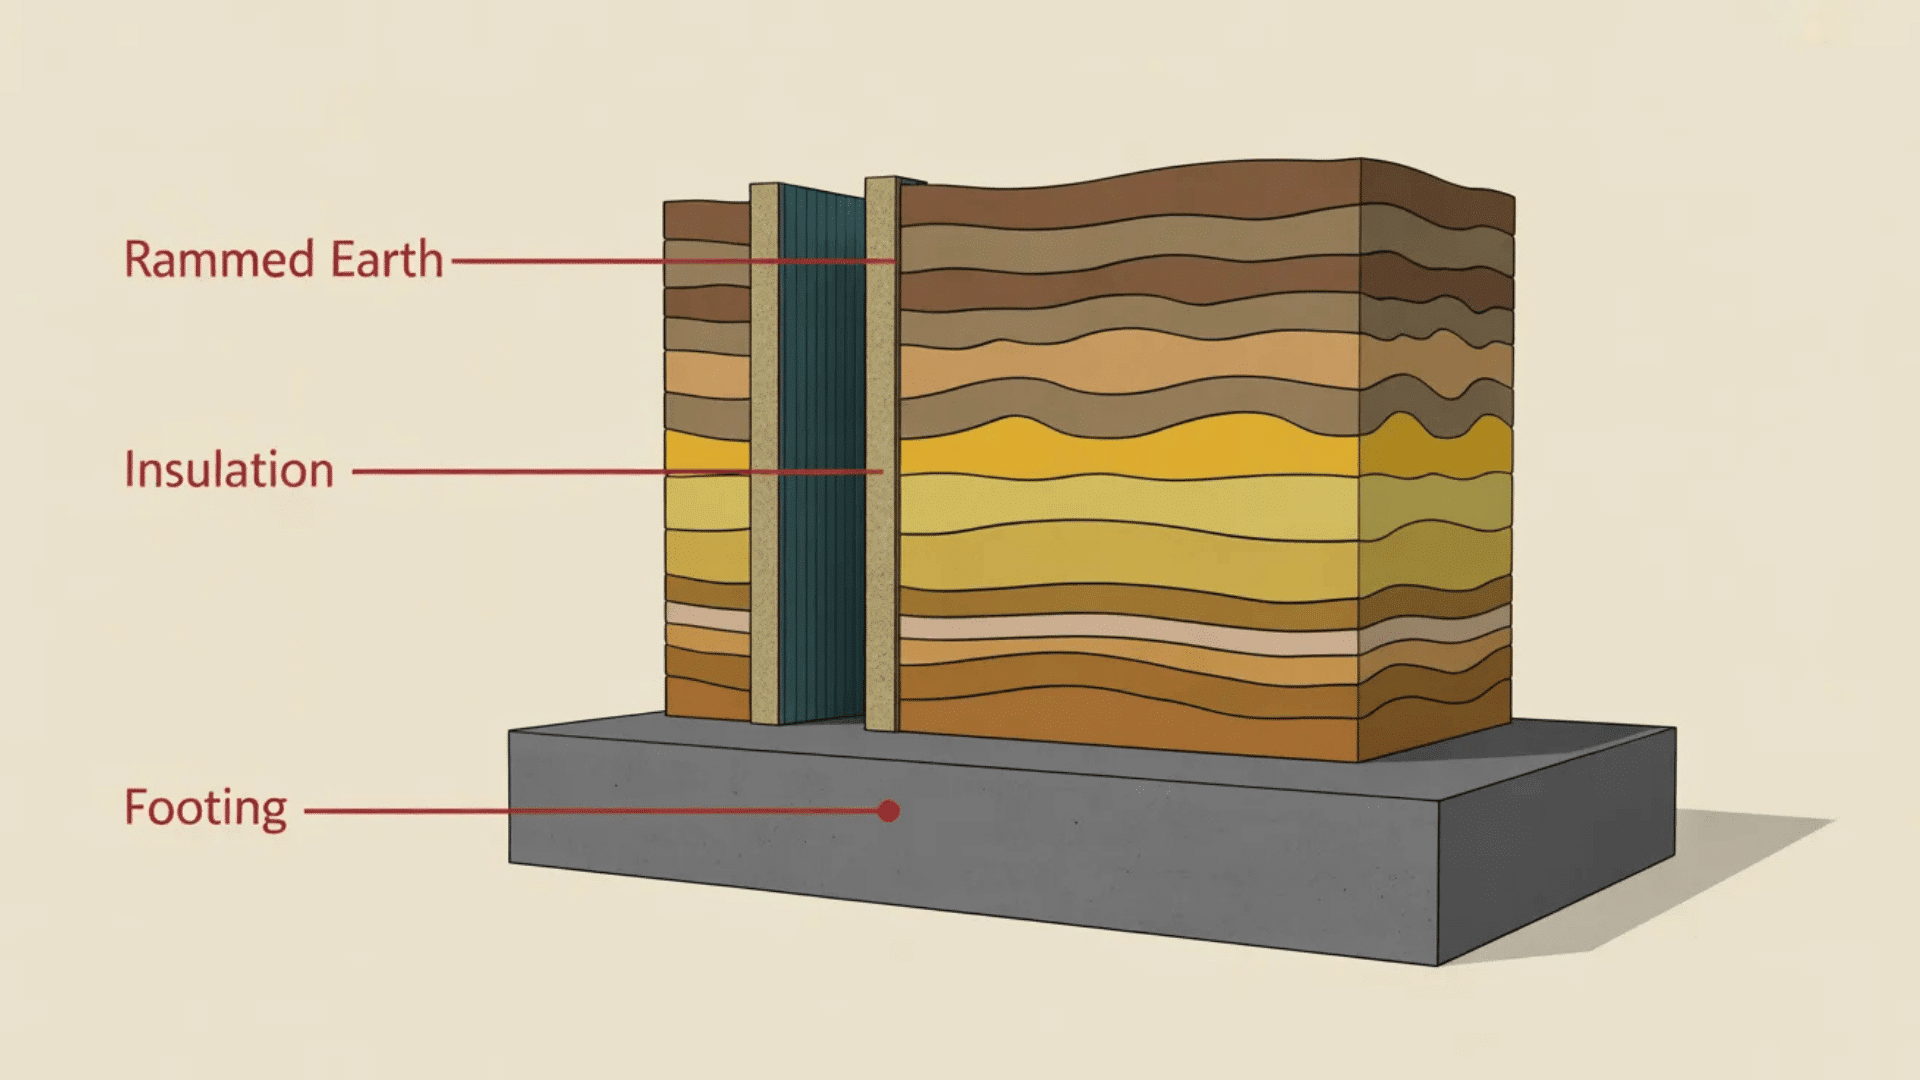
| Wall Thickness | Typically, 12 to 24 inches thick, much wider than standard walls. |
| Temperature Control | Thicker walls keep indoor temperatures more stable year-round. |
| Window Openings | Deep window sills created by the thick walls are perfect for plants or display. |
| Door Frames | Wide door jambs that need special detailing and create a strong visual statement. |
These features aren’t mistakes – they’re what make rammed earth buildings beautiful and functional. The thick walls and natural patterns tell the story of how your building was made.
Rammed Earth Construction Details At A Glance
Building with rammed earth isn’t complicated, but getting certain details right makes all the difference. These key points help make a rigid foundation:
- Water management at the base: Keep the bottom of your walls dry by raising them off the ground with a concrete or stone foundation. Water soaking up from below will damage earth walls faster than anything else.
- Roof overhangs and splash protection: Your roof needs to stick out far enough to keep rain from hitting the walls directly. At least two feet of overhang helps protect the earth from weather damage.
- Strong, well-braced formwork: The wooden frames that hold the wet soil need serious support. Weak or wobbly forms will bulge out and create uneven walls that look bad and perform worse.
- Consistent moisture and compaction: Each layer needs the same amount of water and the same amount of pounding. Too-wet or too-dry soil won’t compress properly, and skipping the hard ramming creates weak spots.
- Structural connections and anchorage: Roof beams, floor joists, and other structural members must be securely anchored to earth walls. Plan these connection points before you start building, not after the walls are up.
- Insulation strategy: Thick earth walls store heat well, but don’t block heat flow as well as foam does. In cold climates, you might need extra insulation added to the outside or inside of the wall.
Get these six details right from the start, and your rammed-earth building will perform well for decades.
Materials And Methods For Rammed Earth Construction
Building with rammed earth requires specific materials and a careful step-by-step approach. Understanding what you need and how to use it properly makes the whole process smoother and more successful.
Materials Used In Rammed Earth Construction
| Material | What It Does |
|---|---|
| Soil Mix | A blend of sand, gravel, silt, and clay. Sand and gravel give strength, while clay holds everything together naturally. |
| Stabilizers | Cement or lime is added in small amounts to make walls stronger and more water-resistant. Often used in modern projects. |
| Water | Dampens the soil just enough for proper compaction. The mix should feel moist, not wet or muddy. |
| Formwork | Temporary wooden or metal panels that hold the soil in place while you pack it down. Removed after the wall hardens. |
| Reinforcement | Steel bars or mesh are added when needed for extra strength, earthquake safety, or support around doors and windows. |
| Foundation Materials | Concrete footings or stone bases that lift the earth walls above ground level and block rising moisture. |
| Moisture Barriers | Waterproof membranes are placed between the foundation and the earth wall to prevent water from seeping into the wall. |
| Protective Finishes | Breathable sealers or natural coatings that protect the wall surface from rain and wind erosion without trapping moisture inside. |
Methods Used In Rammed Earth Construction
The actual building process follows a specific order that can’t be skipped or rushed. Each step depends on the one before it being done correctly.
Here’s how rammed-earth walls go up from start to finish:
- Soil testing and mix design: Test your soil to check the balance of sand, clay, and gravel. Add what’s missing until the mix compacts properly.
- Formwork setup: Build strong forms and brace them well. They must stay straight and handle heavy pressure without bending during compaction.
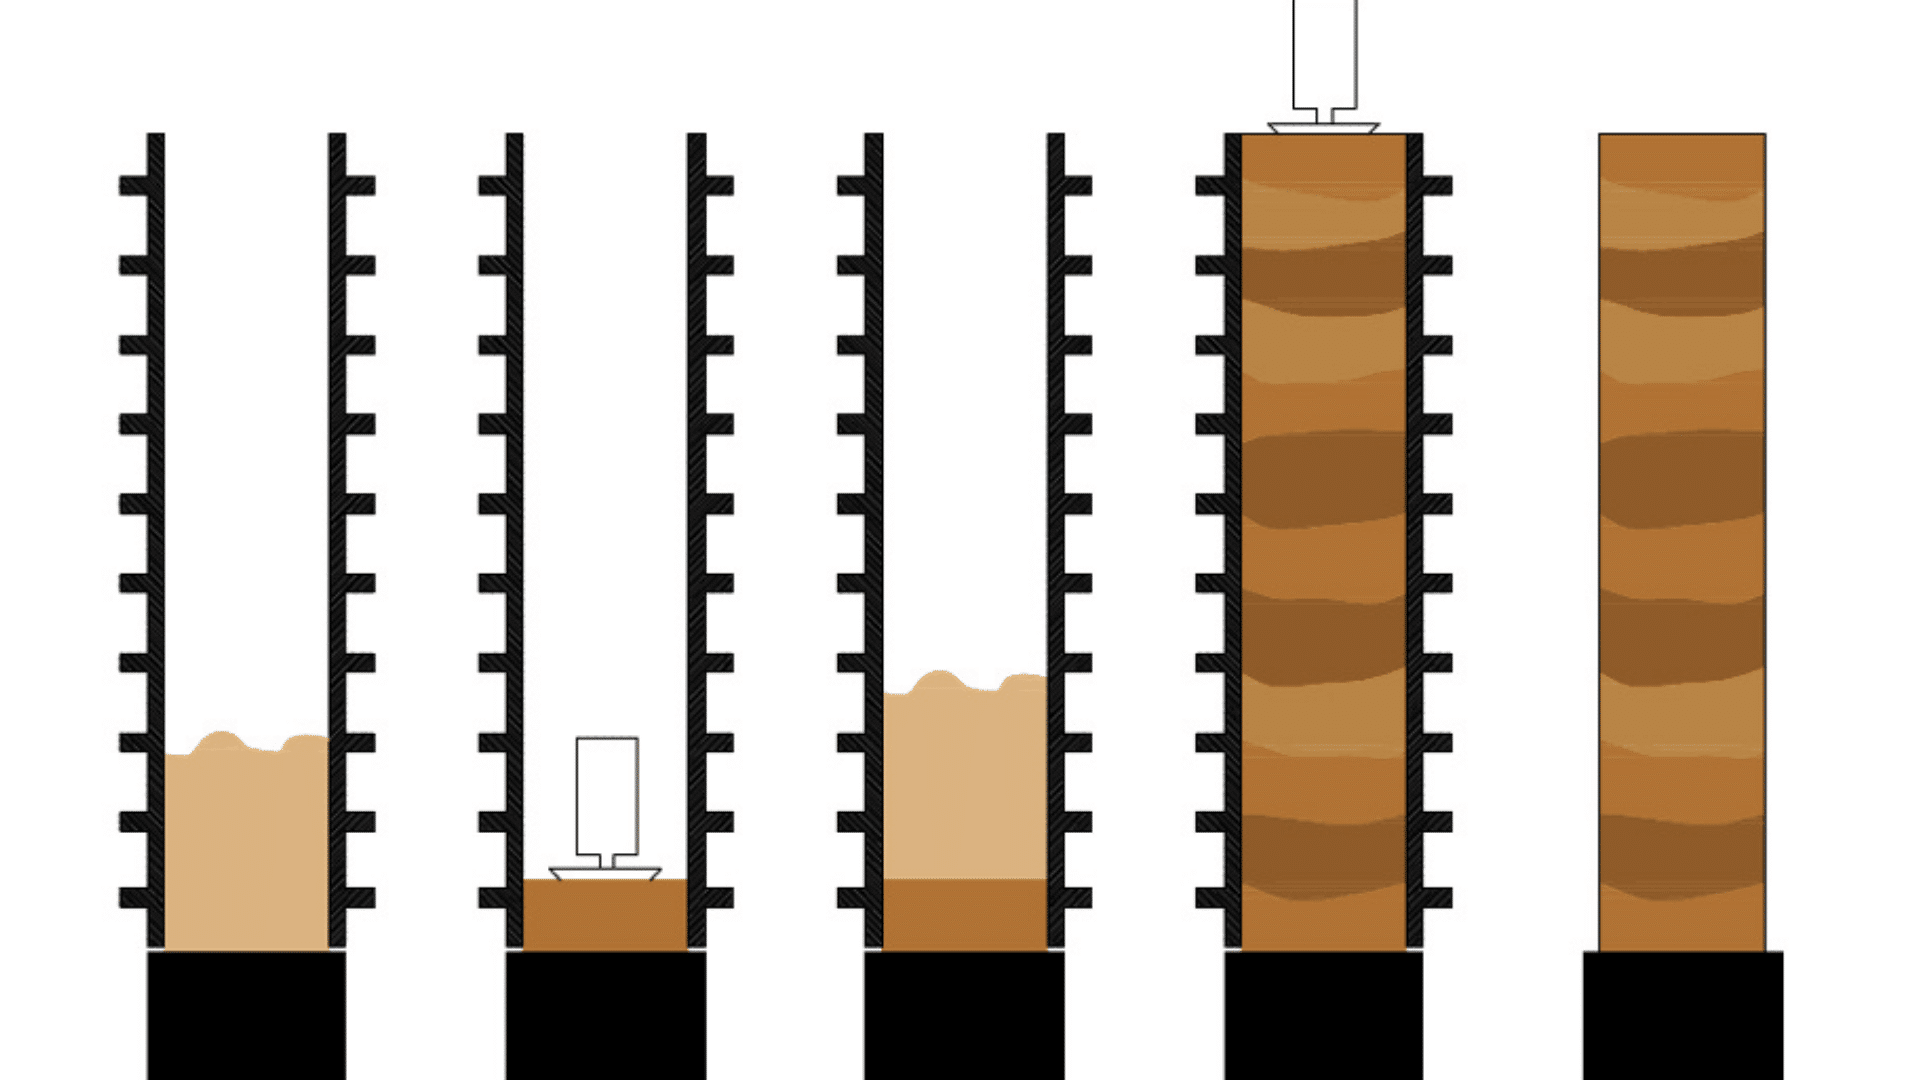
- Layered placement: Add damp soil in thin layers, four to six inches deep. Never use thick layers because they won’t compress evenly.
- Ramming and compaction: Pound each layer firmly with tools or a powered rammer until it is dense and barely moves under pressure.
- Sequential wall building: Remove forms once a section hardens, then move them higher or to the next section. Build in stages.
- Curing and protection: Shield freshly cast walls from rain, sun, and wind after removing the forms. Walls need a slow, even drying time.
- Detail integration: Install door frames, windows, electrical boxes, and reinforcement as you build. Adding them later damages the wall and creates weak spots.
Follow these methods in order, and you’ll end up with solid, durable walls. Do not rush to avoid issues months or years down the road.
Benefits Of Rammed Earth Construction
Rammed earth offers real advantages that modern materials can’t always match. But like any building method, it also has limitations you need to understand before you start.
- Rammed-earth walls last for generations without rotting, rusting, or breaking down. They resist fire completely and keep termites and other pests out naturally.
- The thick walls store heat during the day and release it slowly at night. This keeps indoor temperatures comfortable without using much heating or cooling energy.
- You’re building with simple materials found almost anywhere. No special orders, no shipping delays, and no complicated chemicals that need safety equipment to handle.
- The natural look and solid feel of earth walls create spaces that feel calm and grounded. Many people find them more comfortable than buildings made with synthetic materials.
These benefits explain why rammed earth continues to gain popularity despite being an ancient technique.
Rammed Earth Construction Process
Building a rammed-earth wall isn’t complicated, but it does require following specific steps in order. Skip one, and you’ll likely face problems later. Here’s how the process works from start to finish.
Step 1: Soil Testing And Trial Wall
Build a small test wall first before starting your actual project. This lets you check whether your soil mix compacts properly, looks the way you want, and reaches the required strength.
Adjust the mix based on what you learn from this trial.
Step 2: Site Prep, Foundation, And Drainage
Level your building site and dig trenches for the foundation. Pour concrete footings that sit above ground level.
Install drainage systems around the foundation to move water away from where your earth walls will stand.
Step 3: Formwork Setup And Alignment
Build your wooden forms perfectly straight and level using braces and supports. Check that everything is plumb and square.
The forms must be strong enough to handle the pressure of ramming without bowing, shifting, or coming apart.
Step 4: Mixing, Placing, And Ramming
Add water to your soil mix until it feels just right – damp but not wet. Pour it into the forms in thin layers.
Ram each layer firmly and evenly until it is solid and dense, then add the next layer.
Step 5: Stripping Forms, Curing, And Protection
Wait until the wall is firm enough to stand on its own, then carefully remove the forms. Patch any small holes or gaps right away.
Cover the walls to protect them from rain and direct sun while they finish drying and hardening.
Follow these steps carefully and in order for the best results. Rushing through any stage can show up as problems in your finished walls later.
Finishes, Sealers, And Maintenance Details
Rammed-earth walls are strong, but they still need some care to perform their best over time. The right finish and regular checkups keep your walls looking good and working properly for years to come.
- Indoor vs. outdoor sealing: Inside walls stay naturally protected. Outside walls need breathable sealers that block water while letting moisture escape, especially in harsh weather.
- Choose natural sealers: Lime washes, natural oils, and silicate-based sealers work best. They protect without trapping moisture inside or damaging the earth with harsh chemicals.
- Check for erosion twice a year: Look for worn spots, cracks, or crumbling areas. Pay close attention to the bottom few feet, where rain and ground moisture cause damage.
- Keep drainage working: Water must flow away from walls and not pool near the foundation. Standing water quickly damages earth walls, so maintain good drainage at all times.
- Handle repairs and upkeep promptly: Fix small eroded spots before they grow. Reapply sealers every few years if used, and keep plants and sprinklers away from wall bases.
Taking care of rammed-earth walls isn’t difficult or time-consuming. A little regular attention keeps them strong and beautiful for generations.
Conclusion
Rammed earth construction details make the difference between walls that last and walls that fail early.
Focus on keeping water away from the base, building strong formwork that won’t budge, compacting each layer consistently, planning your structural connections early, and choosing the right insulation approach for your climate.
These aren’t optional extras – they’re the foundation of success.
Before you start building, check your local building codes and talk to an engineer about structural design.
Rammed earth requires proper planning, and professional guidance can save you from costly mistakes down the road.
The beauty of this building method is that it rewards attention to detail with walls that stand strong for generations.
Ready to start your rammed earth project? Comment below what you will build with Earth.