
Crown molding sits at the spot where the wall meets the ceiling, and it is one of the simplest ways to make a plain room look finished.
It hides small gaps, frames the ceiling line, and gives any space a more pulled-together look.
Here is everything you need to know: the types of molding to choose from, the materials worth considering, and the exact steps to get it installed right.
What is Crown Molding?
Crown molding is a decorative trim piece installed along the top edge of a wall, right where it meets the ceiling. It sits at an angle, bridging the two surfaces instead of forming a hard, flat corner.
In simple terms, what is crown molding really doing?
It softens that transition line, hides small gaps or uneven edges, and gives the room a finished frame around the top.
Many homeowners pair it with decorative ceiling beams for an even bolder ceiling detail.
The style dates back to classical architecture, where builders used carved stone trim to mark the top of columns and walls.
Today, it shows up in wood, foam, and plastic versions that homeowners can buy at any hardware store and fit into rooms of any size.
Why Crown Molding is Used in Homes
Crown molding earns its place in so many homes because it does more than look nice. It hides small imperfections where drywall meets the ceiling, so cracks, gaps, and uneven paint lines become far less noticeable.
It also changes how a room feels. A well-chosen profile can make ceilings look taller, rooms feel more put together, and plain walls feel less bare.
Buyers and appraisers often notice trim details too. Adding crown molding to a living room, dining room, or entryway is a small upgrade that can support a home’s resale value, since it signals attention to detail throughout the space.
Types of Molding (Detailed Breakdown)
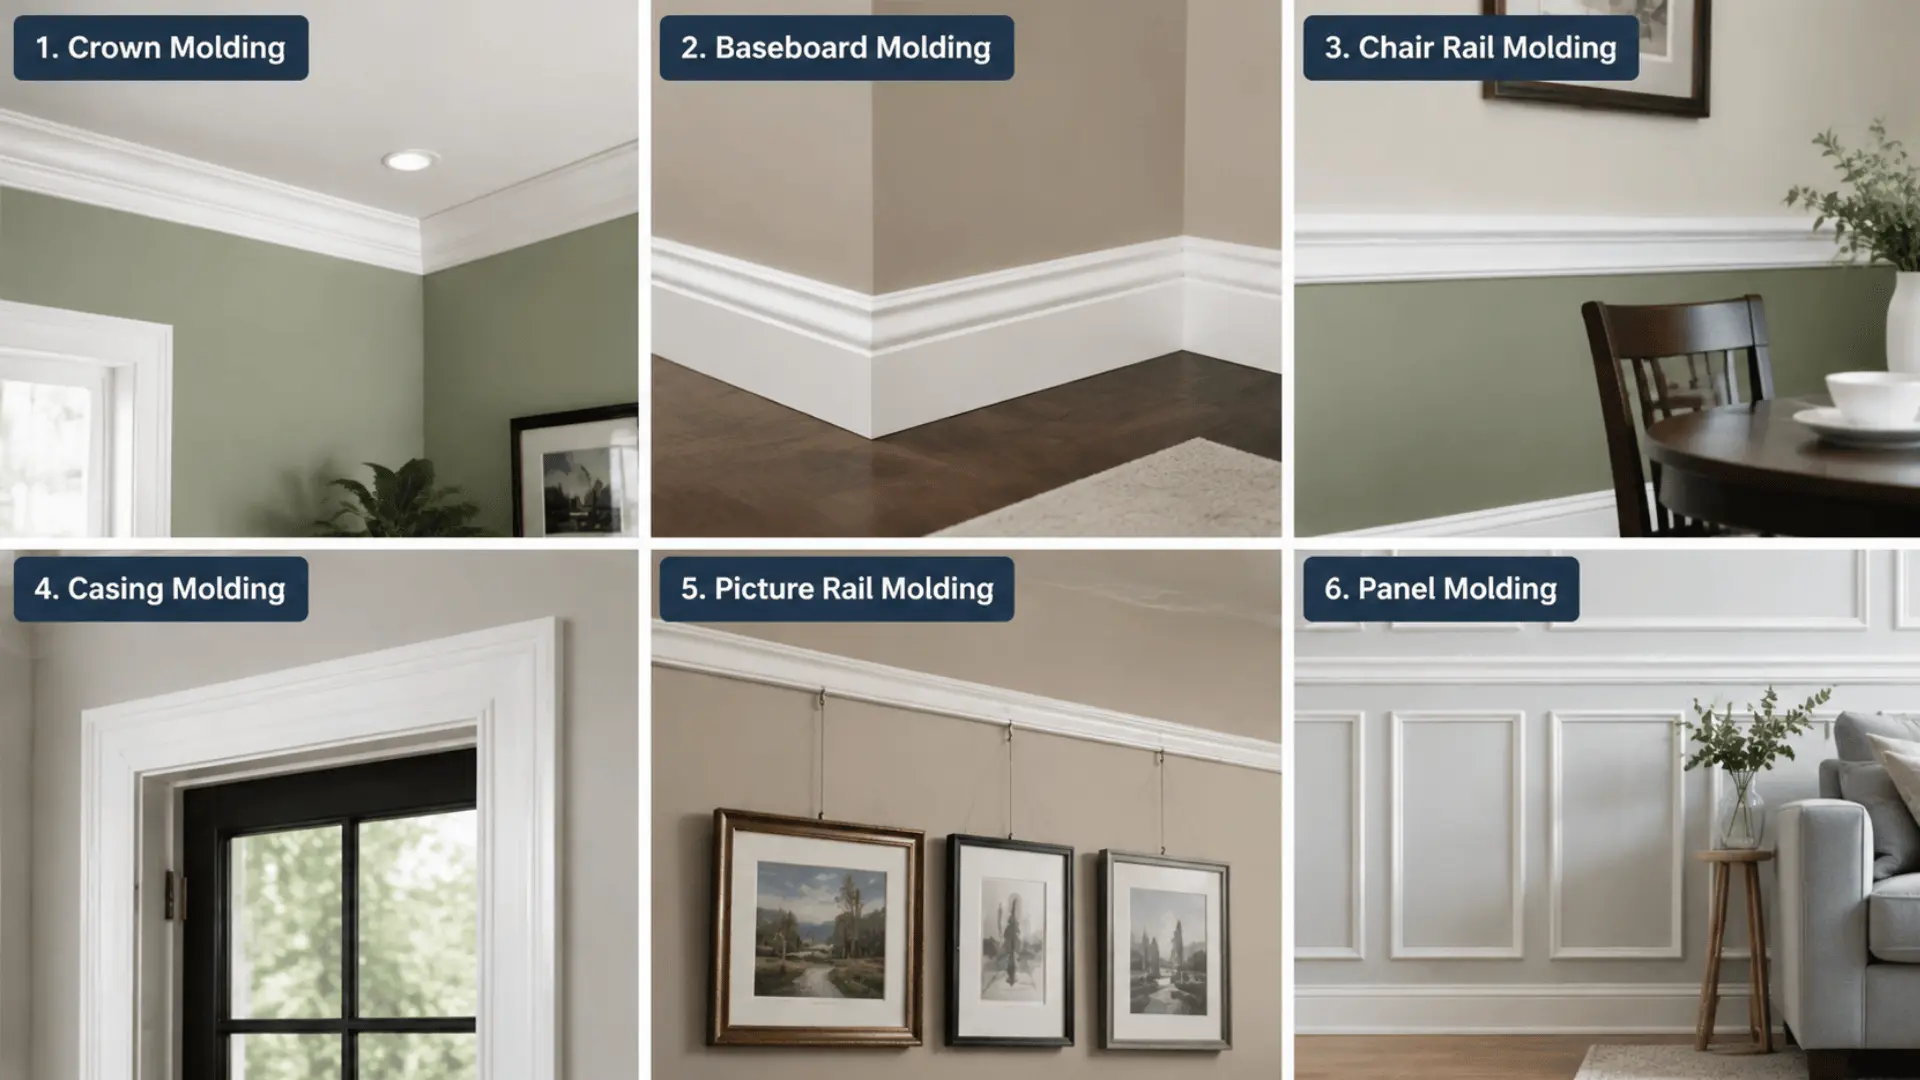
Crown molding is only one entry in a much bigger family. Knowing the different types of molding helps you choose the right trim for each part of your home.
1. Crown Molding
This is the trim installed at the top of the wall, right at the ceiling line. It is mostly decorative but also helps disguise small construction gaps.
2. Baseboard Molding
Baseboard sits at the bottom of the wall, where it meets the floor. It protects the wall from scuffs, vacuum bumps, and furniture marks while giving the room a clean, finished edge.
3. Chair Rail Molding
Chair rail runs partway up the wall, usually around waist height. It once protected walls from chair backs and now mostly serves as a design element, splitting the wall into two visual zones.
4. Casing Molding
Casing frames, doors, and windows. It covers the rough edges where the frame meets the wall and gives openings a neat, finished border. If you are updating trim throughout the house, these modern window trim ideas pair well with a matching casing style.
5. Picture Rail Molding
Picture rail sits a bit below the ceiling and allows artwork to hang from hooks and wire instead of nails driven into the wall. It is common in older homes and galleries that rotate their art often.
6. Panel Molding
Panel molding is used to build decorative shapes directly on the wall, such as rectangles or squares that mimic wall paneling. It adds texture and depth without the cost of full wood paneling.
Crown Molding Styles Explained
Once you understand the types of molding, the next step is picking a style that matches the room. Crown molding styles range from simple to highly detailed.
Traditional crown molding uses classic curved profiles, often with several layers of detail. It suits colonial, farmhouse, and other traditional home styles.
Modern crown molding favors clean, simple lines with little or no carving. It works well in contemporary spaces where the goal is a quiet, uncluttered ceiling line.
Decorative or ornamental crown molding includes raised patterns, rope details, or dentil blocks. It stands out in formal dining rooms and living rooms that call for extra detail.
Cove molding uses a smooth concave curve instead of sharp angles. It provides a softer, more rounded transition between the wall and ceiling and pairs well with minimalist interiors.
Crown Molding Materials You Can Choose From
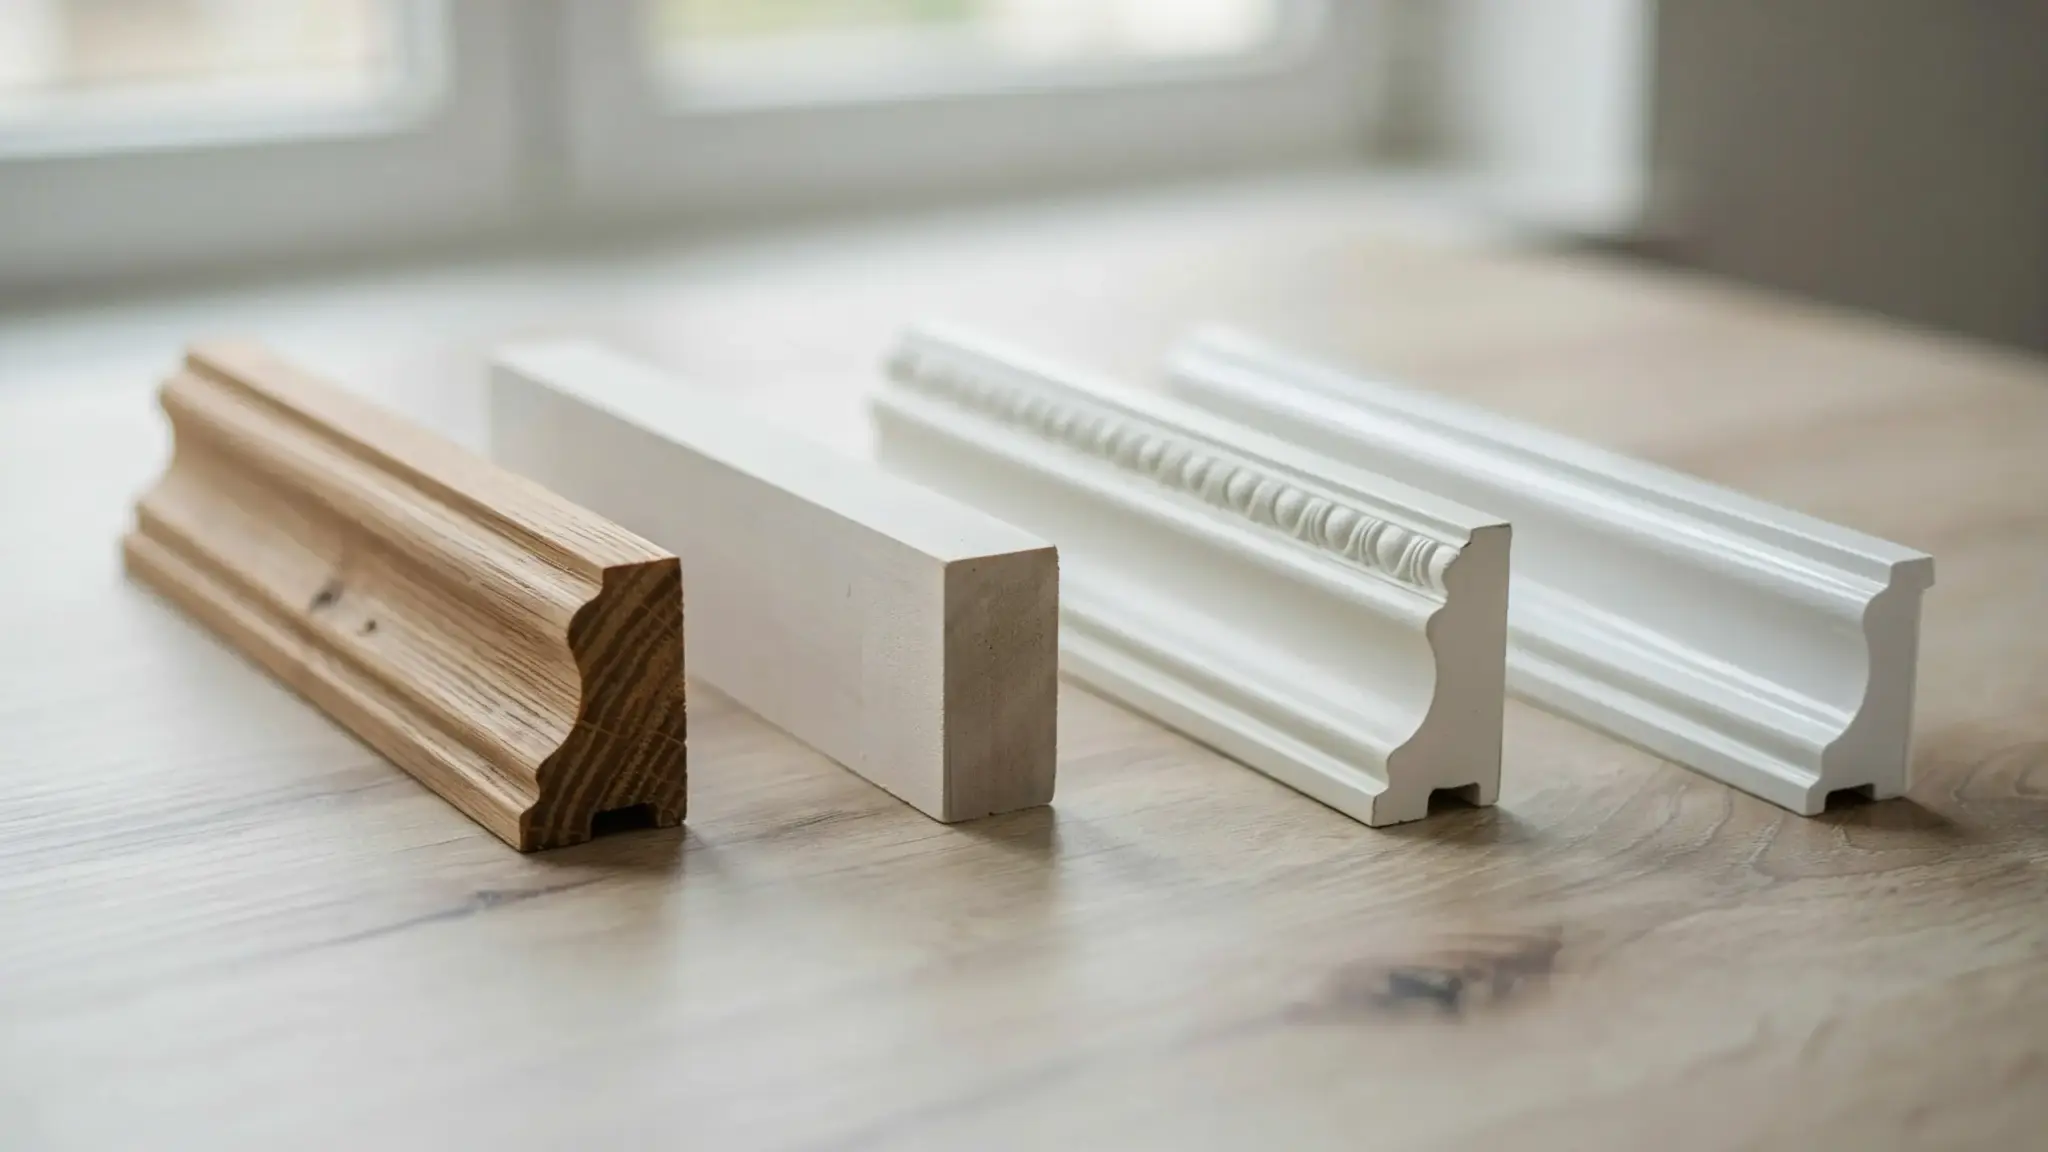
Material choice affects price, durability, and how easy the trim is to install. Here is a quick look at the most common options.
- Solid wood is the traditional pick. It can be stained or painted, holds up for decades, and gives a warm, authentic feel, though it costs more and takes more skill to cut and join at the corners.
- MDF, or medium-density fiberboard, is budget-friendly and takes paint well. It is not a good match for bathrooms or other humid spaces, as it can swell or warp in moisture.
- Polyurethane is lightweight, moisture-resistant, and pre-primed for paint. It is a popular pick for DIY projects because it is easier to cut and handle than solid wood.
- PVC or vinyl trim holds up well in kitchens, bathrooms, and other high-humidity areas. It usually only comes in white and is not meant to be stained.
- Plaster molding is the premium option, often custom-made for high-end or historic homes. It can be shaped into detailed patterns, but it requires a skilled installer and a wall structure that can support its weight.
How to Choose the Right Crown Molding
Picking the right size and style takes a bit of planning. A few factors make the decision easier.
Ceiling height matters more than people expect. Taller ceilings can handle wider, more detailed molding, while lower ceilings usually look better with a narrower, simpler profile.
Room size plays a role too. Large rooms can carry bold trim without feeling crowded, while small rooms often look better with something more subtle.
Interior style should guide the choice between traditional, modern, or decorative profiles. Matching the molding to existing trim, furniture, and finishes keeps the whole room looking connected.
Budget narrows the material list quickly. MDF and PVC offer a wood-like look at a lower price point, making them common choices for larger projects.
Moisture exposure should rule out MDF and wood in kitchens, bathrooms, and other damp spaces. PVC and polyurethane hold up far better in those rooms.
Crown Molding Installation Guide (DIY Section)
Installing crown molding is a project many homeowners can tackle themselves with the right tools and a bit of patience.
Tools You Will Need
A miter saw makes the angled cuts needed at corners, and a coping saw helps fine-tune those cuts for a tight fit. You will also need a tape measure, a stud finder, a nail gun or hammer, construction adhesive, caulk, and wood filler for the final touches.
Step-by-Step Installation Overview
Installing crown molding requires careful measurement, accurate cutting, and secure fitting to achieve a clean, professional ceiling finish.
- Measure walls carefully and mark light guide lines on the ceiling and wall
- Cut molding pieces using correct miter angles for corners
- Dry fit all pieces to ensure proper alignment before fixing
- Secure molding into wall studs using nails and adhesive
- Fill gaps, nail holes, and seams with caulk and wood filler
- Sand and paint for a smooth, professional finish
A properly installed crown molding adds elegance, depth, and a polished architectural finish to any interior space.
Picking the right sheen matters here too, so it helps to review these different paint finishes before you commit to one.
Common Mistakes to Avoid
Cutting the wrong miter angle is the most common error, especially at inside corners where the angle needs careful attention. Take time to test cuts on scrap material first.
Skipping the stud finder step often leads to loose molding that pulls away from the wall over time. Poor caulking at the seams can also leave visible gaps once the paint dries, so it is worth taking a slower, more careful pass on that final step.
Using the wrong material for humid rooms, such as MDF in a bathroom, can lead to swelling and warping within a year or two. Matching material to room conditions from the start avoids the repair down the line.
Crown Molding vs Other Types of Molding
Different types of molding serve specific functional and decorative roles in interior design.
| Type of Molding | Location | Purpose | Key Difference |
|---|---|---|---|
| Crown Molding | Wall-to-ceiling joint | Decorative finish | Adds elegance at the ceiling line |
| Baseboard Molding | Wall-to-floor joint | Protects walls | Prevents scuffs and damage at floor level |
| Casing Molding | Doors & windows | Frames openings | Defines doors/windows instead of ceilings |
| Chair Rail Molding | Mid-wall | Decorative + protection | Splits the wall visually, often optional |
Using multiple molding types together creates a clean, finished, and professionally designed interior look.
Cost of Crown Molding Installation
Pricing varies quite a bit based on material, room size, and labor rates in your area.
As a general guide for 2026, professionally installed crown molding runs between 4 and 23 dollars per linear foot, with most homeowners paying an average total of roughly 600 to 2,100 dollars for a full room.
Material costs alone range from about 1 dollar per linear foot for foam or vinyl trim up to 30 dollars or more per linear foot for premium hardwoods.
Labor typically accounts for more than half of the total project cost, since precise cutting and fitting require real skill.
DIY installation can significantly reduce costs by removing the labor portion of the bill.
It works best for homeowners who are comfortable with a miter saw and are willing to take the time needed to make clean corner cuts.
Maintenance Tips for Crown Molding
Crown molding requires very little upkeep once it is properly installed and finished. A light dusting every few weeks, using a soft cloth or a vacuum brush attachment, keeps it looking clean.
For painted molding, a fresh coat every few years keeps the finish looking sharp, especially in kitchens where grease and steam can build up over time. Stained wood molding benefits from an occasional wipe with a wood-safe cleaner.
Small cracks or gaps that appear over time are usually a sign of house settling rather than a structural problem. A bit of caulk and a touch-up coat of paint typically solve the issue in under an hour.
Final Thoughts
Crown molding is a simple upgrade that adds real character to a room, whether the goal is a traditional look, a modern finish, or something in between.
Picking the right type of molding, the right material, and a style that fits the ceiling height makes all the difference.
For homeowners comfortable with basic tools, installing crown molding is a doable weekend project.
For larger rooms, tricky corners, or premium materials like plaster, hiring a professional carpenter is usually the safer and more cost-effective route in the long run.
Frequently Asked Questions
What is Crown Molding Used for?
Crown molding is used to finish the transition between wall and ceiling, hide small construction gaps, and add architectural detail to a room.
Is Crown Molding Outdated?
Crown molding is still widely used, especially in updated forms with simpler, modern profiles. Homeowners have moved away from heavily ornamental styles in casual rooms but still use trim in dining rooms, entryways, and formal spaces.
What is the Best Material for Crown Molding?
There is no single best material. Wood suits formal rooms with a bigger budget, polyurethane suits DIY projects, and PVC suits kitchens and bathrooms where moisture is a concern.
Can I Install Crown Molding Myself?
Yes, many homeowners install crown molding themselves with a miter saw, a coping saw, and some patience for corner cuts. Larger rooms or detailed plaster molding are usually better left to a professional.
What Size Crown Molding Should I Use?
As a rough guide, rooms with standard 8-foot ceilings look best with molding between 2 and 4 inches wide, while rooms with 9- or 10-foot ceilings can handle molding from 4 to 6 inches or more.